
Table of contents
Overview
This tutorial is aimed to make tweaking the environment lighting and fog parameters waaaaay easier for new users through a method that I used to make my own. EDIT: PICTURES ARE COMING SOONThe result can be seen below.
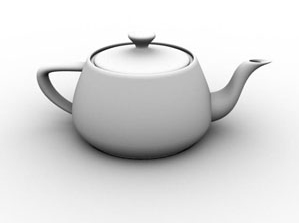
But before you can get there, you're probably gonna get an environment as naked as this...
Don't worry though! We can definitely change that through a couple of not-so simple steps
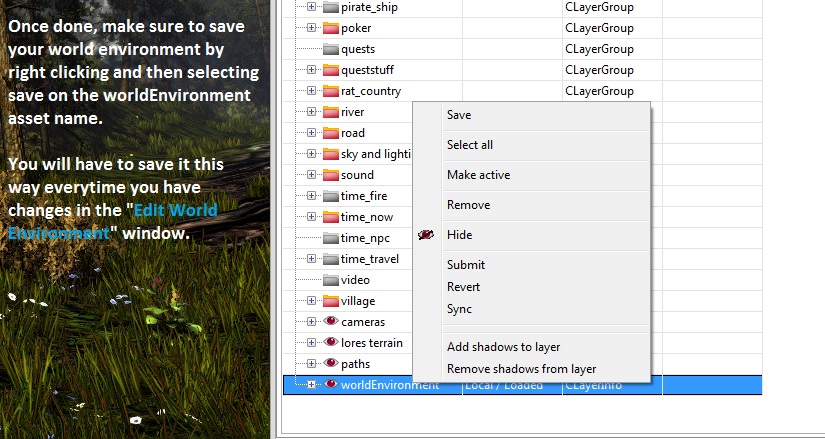
"Setting Up Your Global Parameters
Let's beging by right-clicking on world
and select add group
Ideally, you'd like to name your group in a short but descriptive way.
Ex. environmentParameters_v1, environmentParameters_v2 ... etc.
"Versioning," (_v1, _v2, _v3) will allow you to organize your files easier. This will also make it a whole lot easier for other people to find and recognize your files.
Ideally, your final and approved version should be named something along the lines of environmentParameters_final.
Now, right-click on the group that you created and add layer.
Next, you can save your scene through the following procedure.
Note that when you're saving your "scene," you're only saving your preset of this scene. This means you're only saving what's active and what's inactive-- not the actual parameters that you'll soon be tweaking.
*Random Note of Warning*
OK! Back to topic.
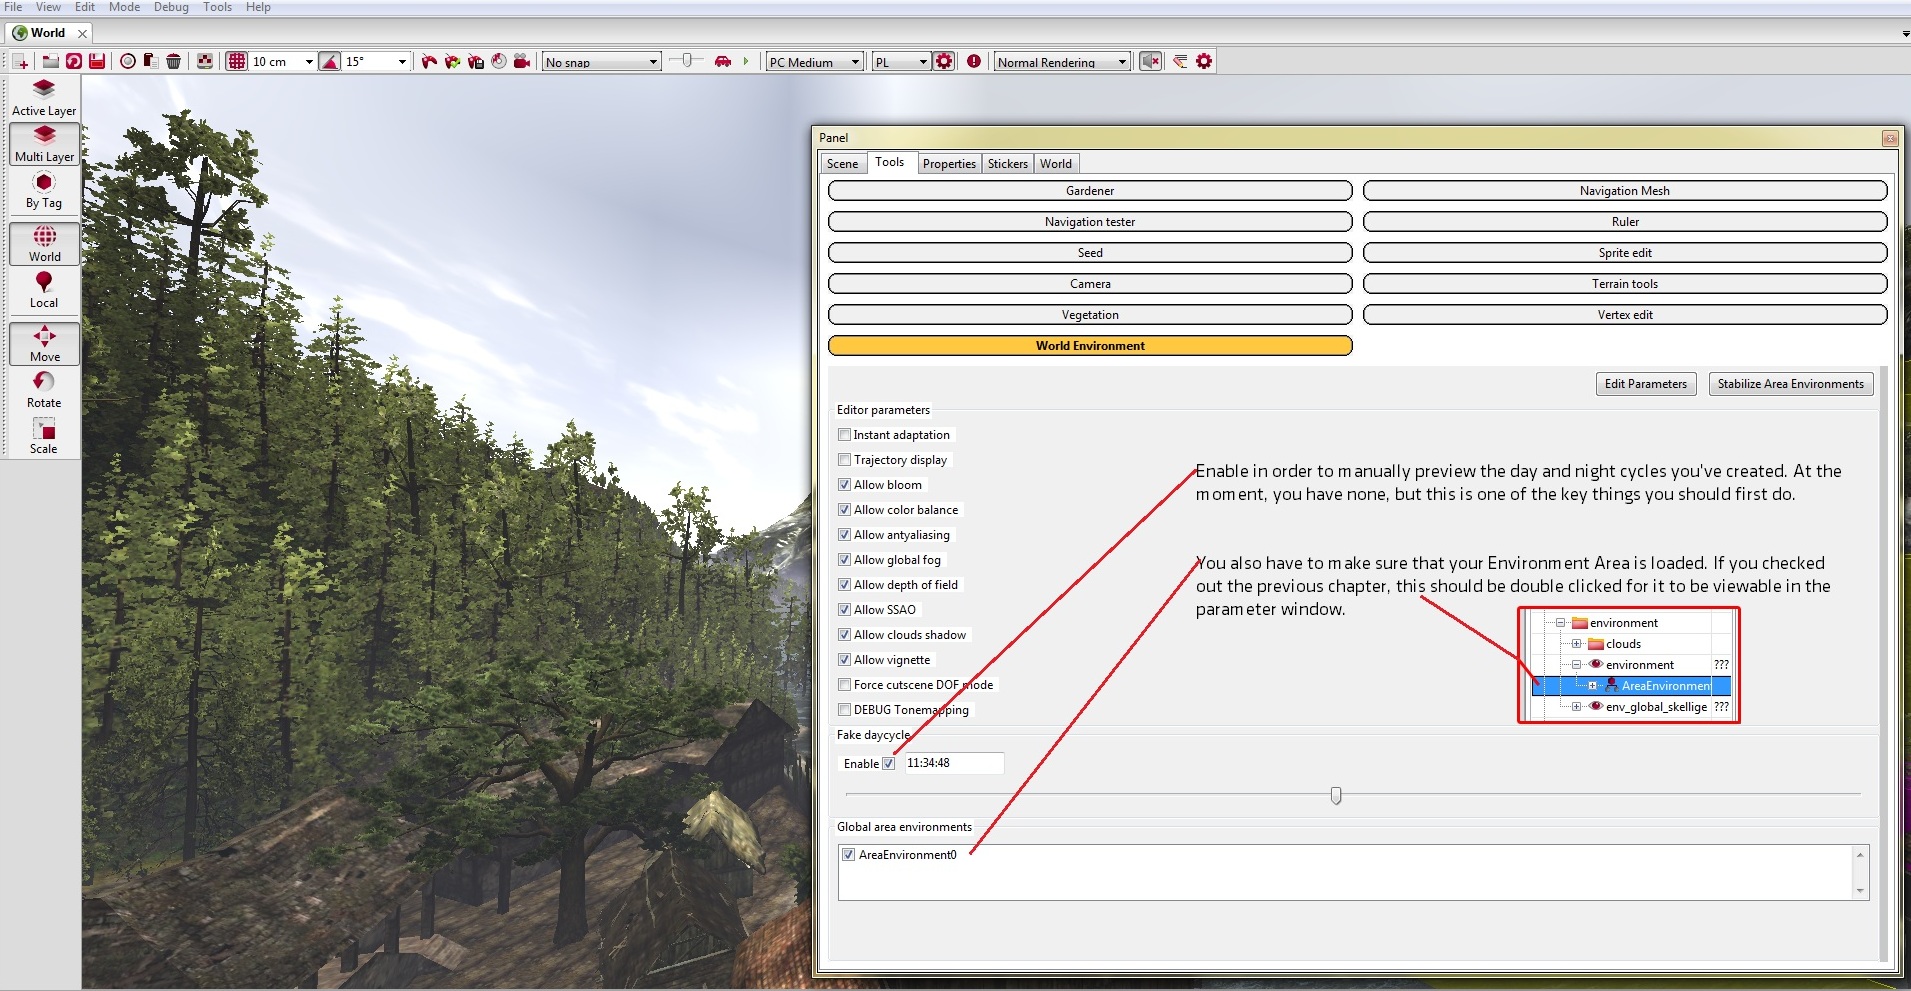
This will create an invisible environment parameter area. Unfortunately, by default, "parameter areas" are swtiched off.
To view it,
Editing Global Parameters
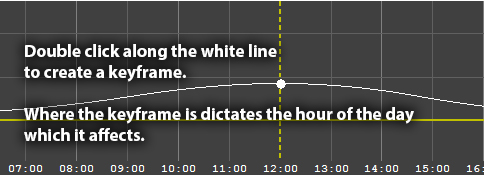
Now it's time to mess around with those parameters!
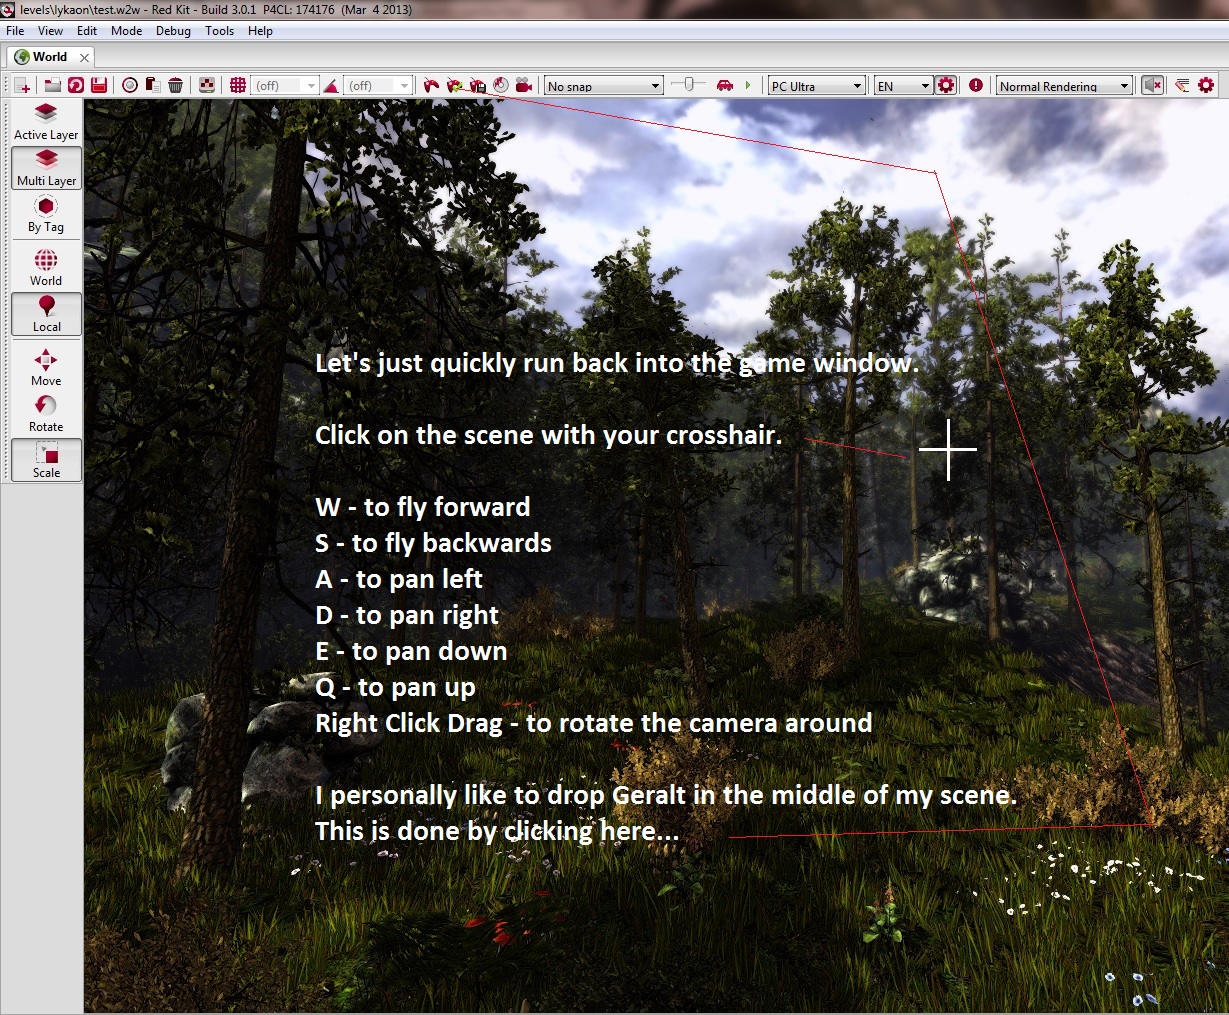
And then suddenly, a man falls from the sky...

The secret to lighting is bringing out the shapes of the geometry within the scene. Lighting together with surfacing makes or breaks the appeal of your work. You can have the most simple pieces of geometry in a set, but still make it seem impressive.
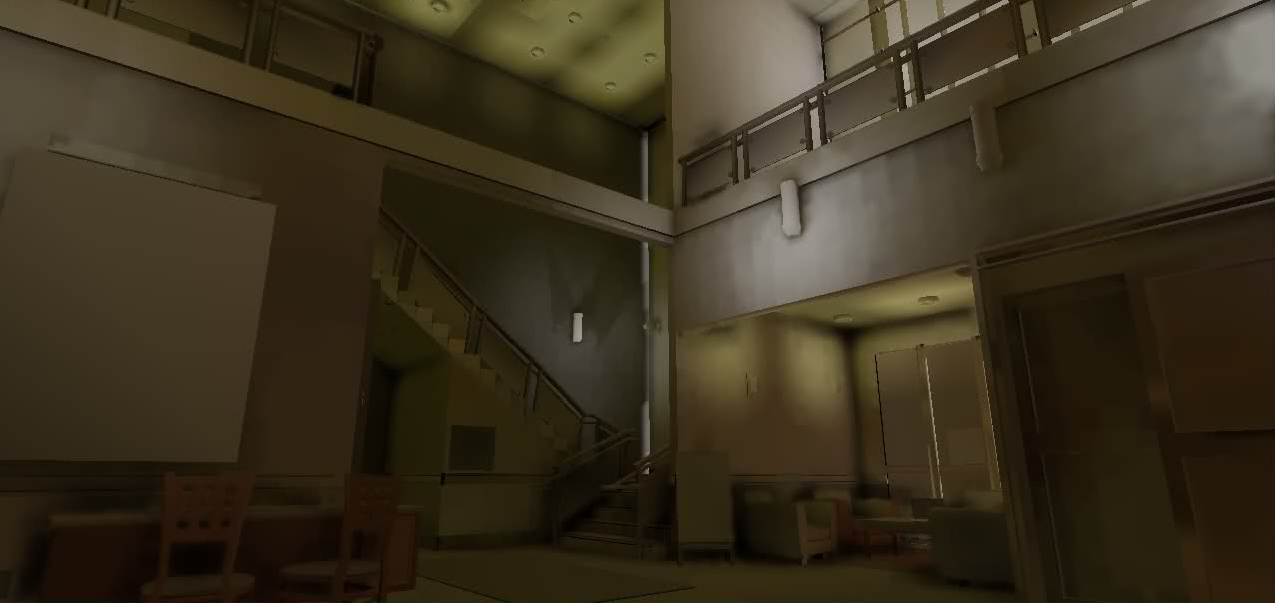
Here's an example of extremely flat lighting.
Here's an example of good chiaroscuro.
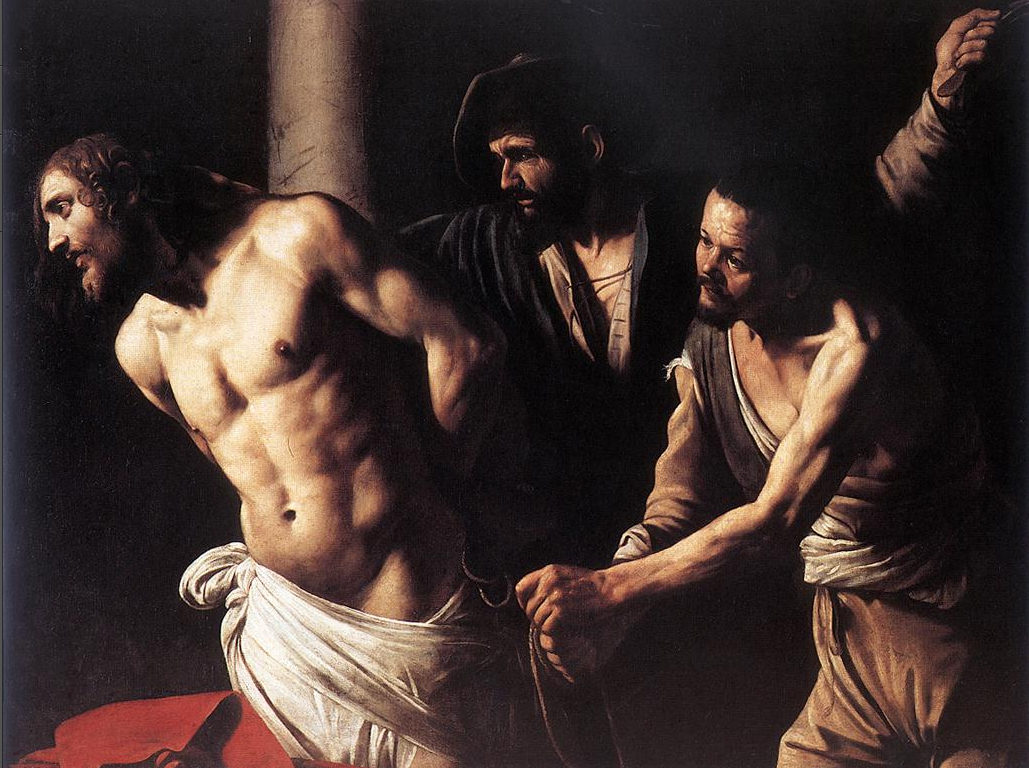
Basically, you'd want to get a good amount of volume to pop out from the scene. This is achieved by increasing contrast as well as choosing the most flattering light direction. You'll also have to watch out though. You would want to retain graphical information in your scene. I try to avoid black/white points or zones that completely lack color information. These are either utterly bleached out or extremely dark to the point that an area has turned black.
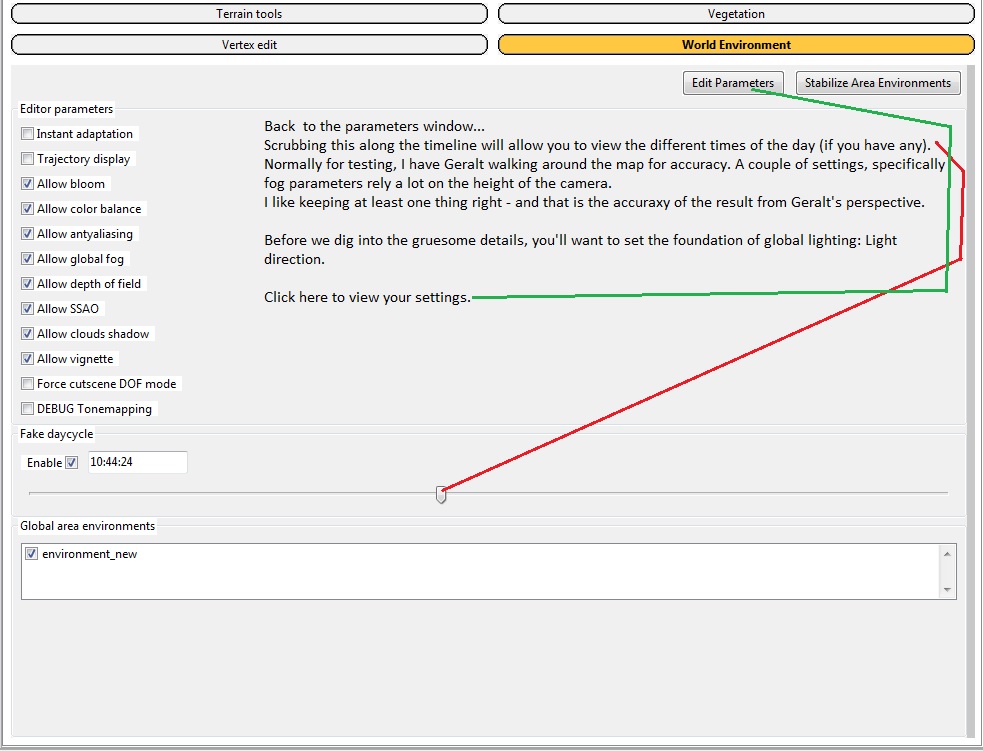
Now we must tweak more specific parameters related to our scene.
For now, let's switch it to TRUE and keep it as a global parameter.
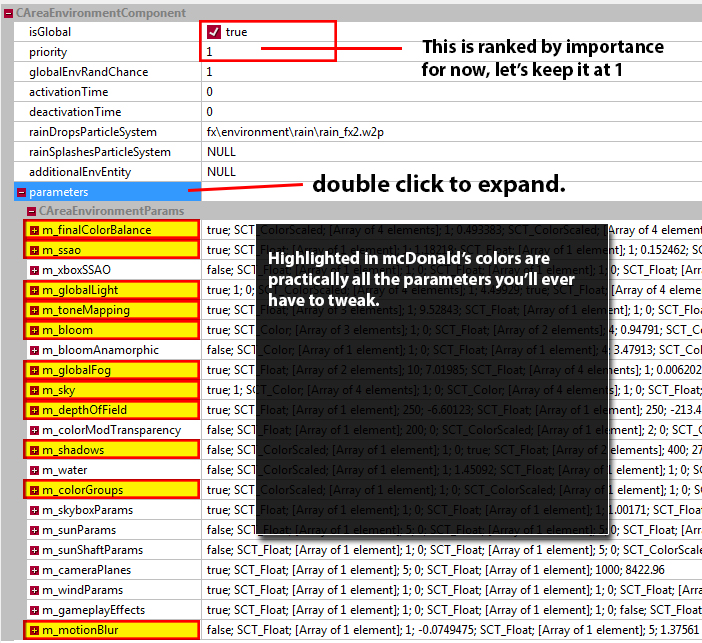

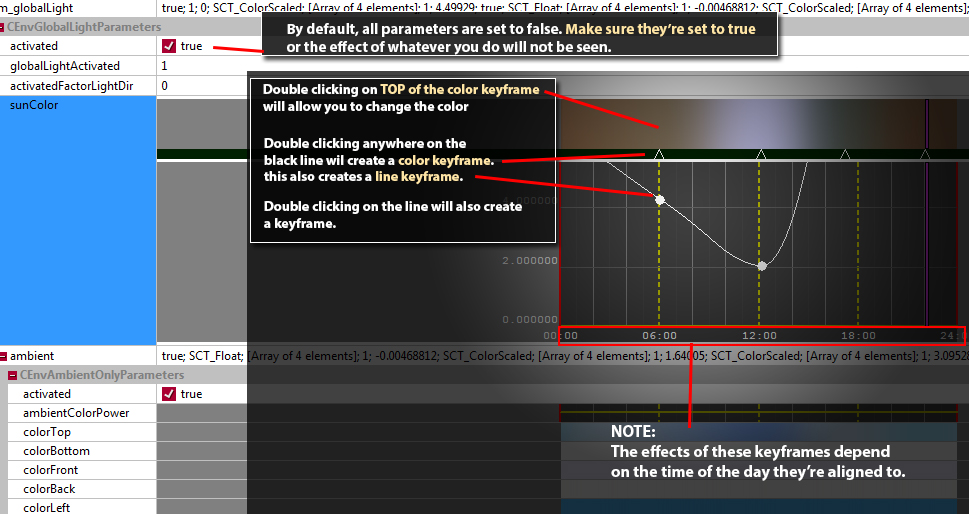
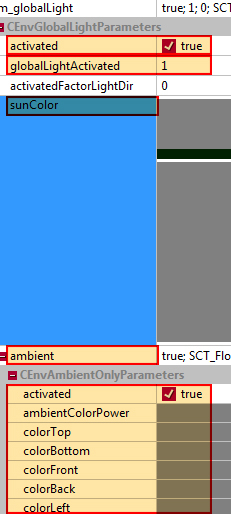
m_globalLight
These are pretty much all of the attributes you have to pay attention to when tweaking m_globalLight.
globalLightActivated - keep this at 1
sunColor - controls both the sun's color and intensity.
ambient - parameter that affects the brightness of everything that's not lit by the sun.
*PLEASE ACTIVATE IT
ambientColorPower - intensity of the ambient light
colorTop, colorBottom, colorFront, colorBack, colorLeft
- all of these control the colors from their respective directions
- I mainly change the values of these parameters ONLY for Geralt's sake so that he could be more visible when I push the ambientColorPower too low.
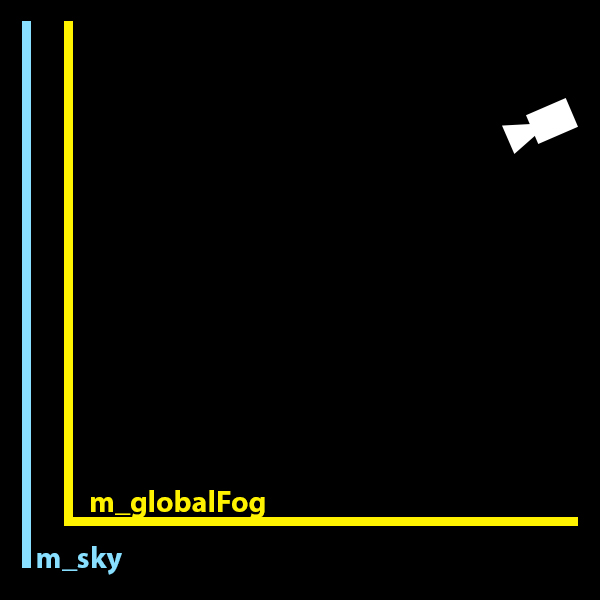
m_globalFog
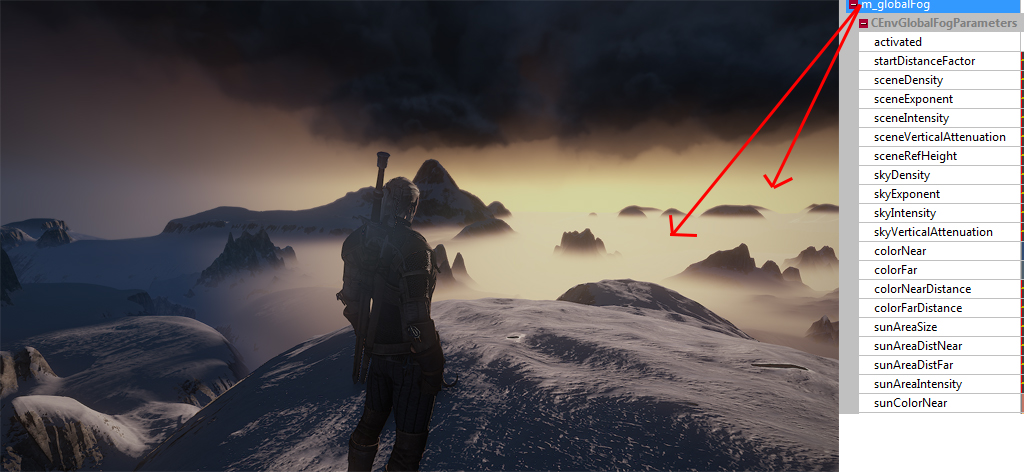
One cannot even begin to imagine how much I hate m_globalFog, but I'll try to explain it as efficiently as I could.
m_globalFog affects two things... a gradient in the sky and a gradient fog on the scene
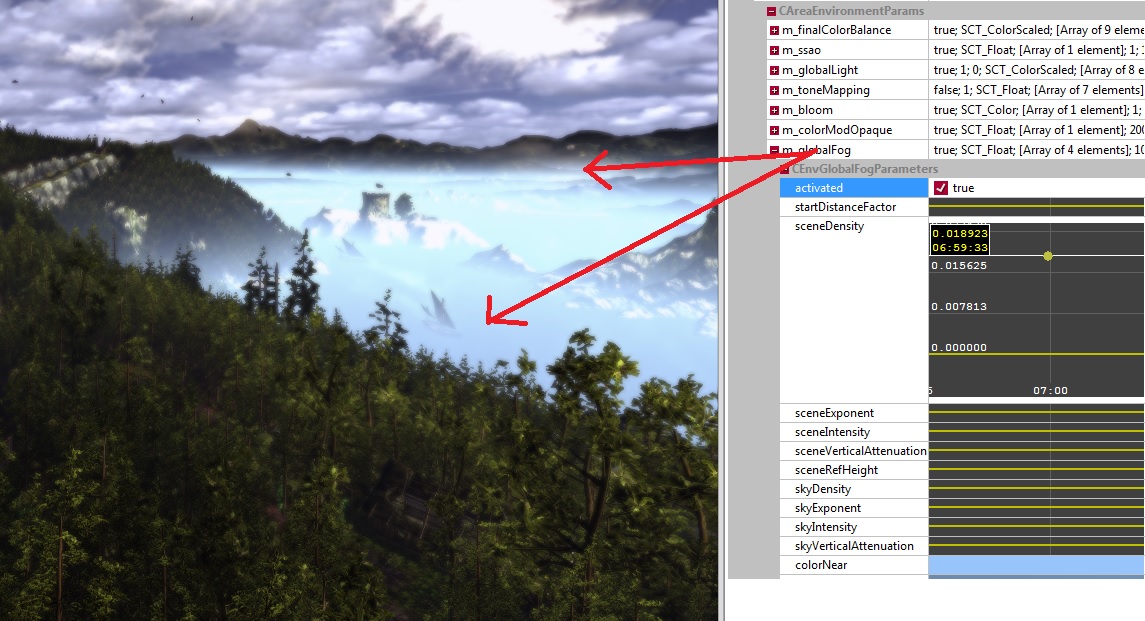
startDistanceFactor - the higher the value, the farther the start of the fog is from the camera.
sceneDensity, sceneExponent, sceneIntensity, sceneVerticalAttenuation, sceneRefHeight
Imagine all of these attributes as a 2d effect that sits on top of your scene.
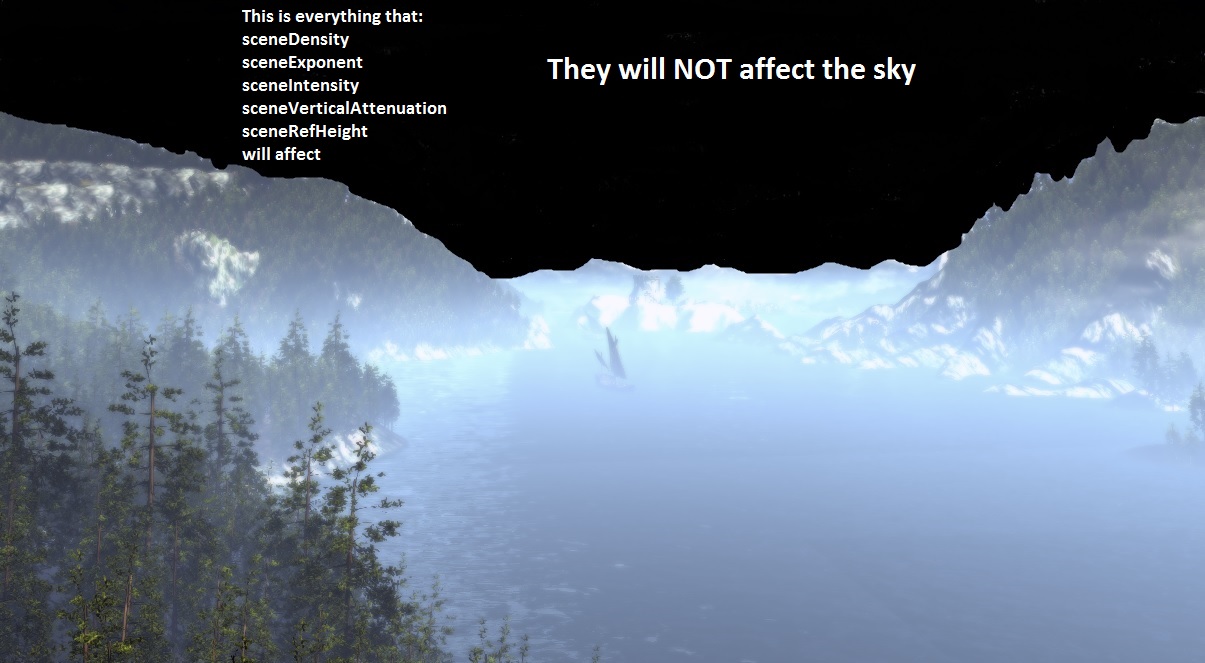
sceneDensity - thickness of the scene fog.
sceneExponent - vertical spread of the scene fog.
sceneIntensity - brightness of the scene fog.
sceneVerticalAttenuation - height of the scene fog. It can also affect the vertical spread.
sceneRefHeight - acts almost exactly like sceneVerticalAttenuation.
skyDensity, skyExponent, skyIntensity, skyVerticalAttenuation
are all fog parameters that are laid ON TOP of the sky.
That means, if you make these parameters too dense, you may cover the color of the sky completely
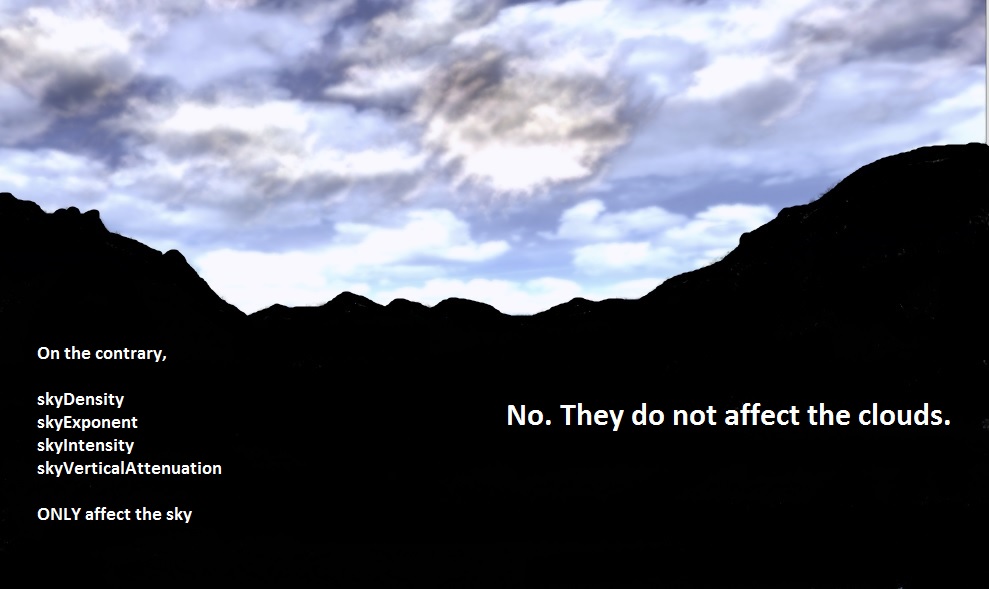
skyDensity, skyExponent, skyVerticalAttenuation - you can think of these three as vertical spread and distance controls for the fog to crawl up the sky.
skyIntensity - brightness of the sky fog.
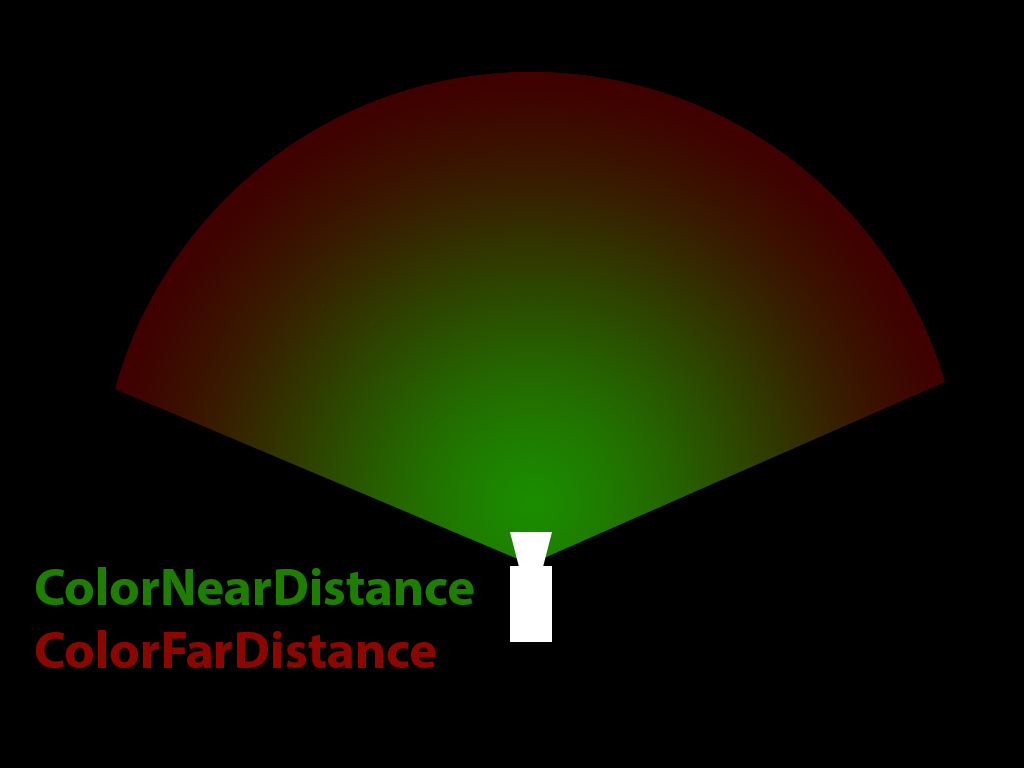
colorNear - color of the fog that is closest to the camera.
colorFar - color of the fog that is farthest from the camera.
colorNearDistance - the higher the value, the farther away from the camera it gets.
colorFarDistance - the higher the value, the farther away from the camera it gets as well
The basic gist is: colorNearDistance and colorFarDistance control the spread of color on each other.
sunAreaSize - affects the radial expansion of the sun on the sky and on the ground.
sunAreaDistNear - think of this as the sun distance cut-off as it goes towards the camera.
sunAreaDistFar - think of this as a opacity spread/feathering.
sunAreaIntensity - brightness of the radial ramp of the sun on the sky and on the scene.
sunColorNear - think of this as the "color of the sun" that is farther from the source. I generally set it as a darker variation of sunColorFar.
sunColorFar - think of this as the "color of the sun" at its hottest point.
- Both of these parameters are laid on top of the actual fog color also known as colorNear and colorFar which were discussed earlier.
m_sky
m_sky controls as described by the parameter name, the sky at its raw form without fog laid on top of it. Sometimes it would seem like the changes that you make here are not affecting the scene at all. The truth is, it does, but your fog is probably blocking everything that you do. — yes, I cannot stress this fact enough.
skyColor - this is the very base sky color. Every other m_sky parameter after this is like a gradient ramp laid on top of it. I normally keep this to a dark bluish gray.
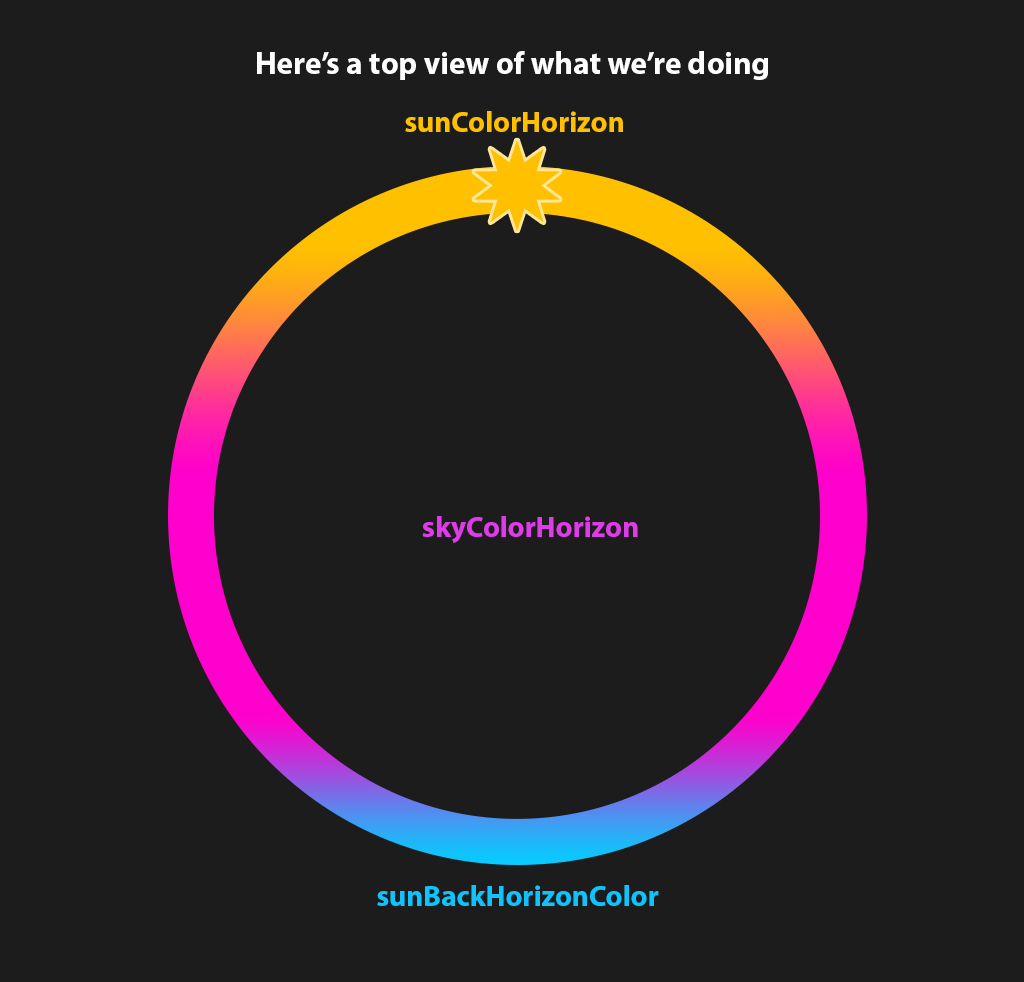
skyColorHorizon - what do you want the color of the horizon to be?
horizonVerticalAttenuation
sunColorSky and sunAreaSkySize
sunColorHorizon and sunColorHorizonHorizontal
sunBackHorizonColor
I decided to change the sunBackHorizonColor to Cyan just for clarity...
globalSkyBrightness - pretty much just makes the entire sky setup brighter.
m_colorGroups
- Activate the m_colorGroups parameter
- Activate the activatedCustom2 parameter
customColorGroup2 - gives color to the clouds in the sky
m_shadows
The only real thing that you need to tweak here is cloudsScale
cloudsScale - adjusts the size of the shadow-casting clouds that you can't see
m_toneMapping
These provide you with a basic color correction control over your environment and character.
brightness - controls the brightness of your overall scene.
m_ssao
Ambient occlusion is the artificial way of computing for shadows caused by ambient light.
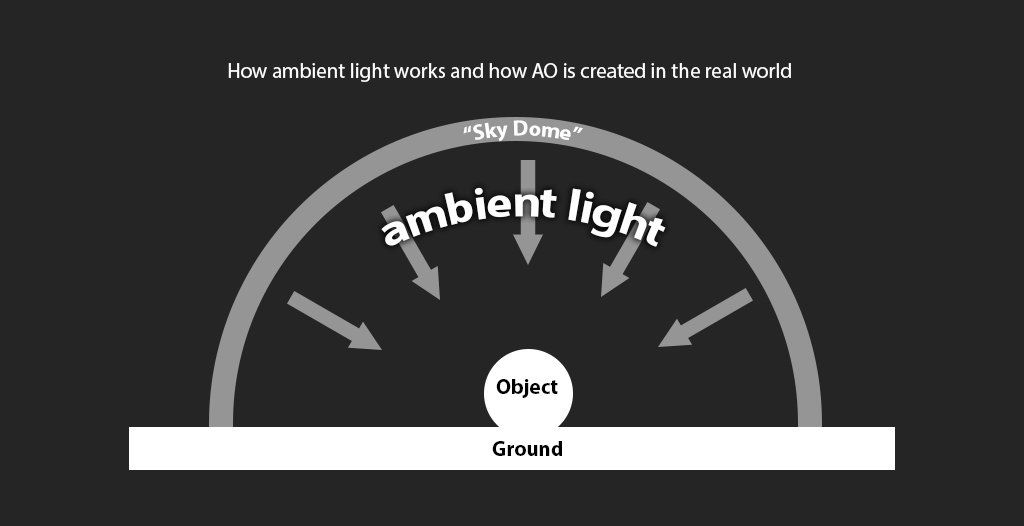
Adding ambient occlusion into your scene will prevent objects from seemingly floating when they're really crashing through each other or on the ground.
m_ssao - is your real-time ambient occlusion controls.
The best way that I found to test this parameter is to have Geralt run into the shadows where a couple of objects and vegetation are around.
Currently, character AO and scene AO are controlled by the same parameters so you'll have to find a good balance for both.
strength - how dark do you want your AO to be?
valueClamp - I just keep this at 0
radius - This is the visible AO radius around an object. Note that this isn't a spread control. Higher values create ghosting that's very obvious on Geralt.
angleBias - the lower the value, the more detail the AO brings out from the scene.
powerExponent - how intense do you want your AO to be?
blurRadius - occlusion spread
blurSharpness - I like this setting because it tightens the occlusion around smaller objects. It helps bring out the irregular detail on the terrain that you wouldn't normally see when Geralt is walking through shadowy parts of the scene. I like pushing this setting to as high as 32. Higher values may tend to cause a really odd "moire effect" as you move around your scene.
m_finalColorBalance
The technique that I use with this editor is by trying to keep the most simple settings as possible. So often can you actually get lost mixing and matching different attributes that override the effects of each other to the point that it might get difficult to troubleshoot. Three different parameters can sometimes create a very good result, but if you can simplify it to just one and leaving the other two at their default, then that would be awesome!
highlightWithScale - choose a color, and the engine will treat it like Photoshop's "Overlay" blend mode. Raise the scale, and you will make it brighter. Lowering the scale will make it darker. I like keeping this at 1.0 though.
midtoneWithScale - this behaves like Photoshop's "Divide" blend mode. Keeping this in grayscale will make your life easier. It's interesting how lowering the value will make it brighter and raising it will make it darker.
shadowWithScale - this behaves like Photoshop's "Subtract." Use this if you want to specifically influence the color of the darker areas of your environment just to increase the contrast. I don't recommend that you use this with any other color value other than ones along the gray scale. Otherwise, you will be changing the authenticity of the texture colors. I recommend starting your parameters with 0 and just slightly moving your keyframe higher or lower.
vignetteWeights - this controls the strength of your vignette. This relies completely on your grayscale values. I personally prefer a value closer to white.
vignetteColor - this controls the color of your vignette.
The following are three parameters control saturation. I normally just keep them at their default values because I prefer to drive saturation with a lot more control using contrastStrengthMax, contrastStrengthMid and contrastStrengthMin.
filterRefLumMax - I just keep this at 1.0.
filterRefLumMid - I just keep this at 1.0.
filterRefLumMin - I just keep this at 0.0
filterLumMaxColor, filterLumMidColor, filterLumMinColor
Unlike filterLumMaxColor and filterLumMinColor, the scope of what filterLumMinColor affects the scene at a greater scale. You may add a light color tint on this parameter. In my case, I like adding a light tint of blue for outdoor scenes to simulate the color bounce from the sky.
contrastStrengthMax, contrastStrengthMid, contrastStrengthMin
These three parameters do not actually affect the contrast of your scene. In reality, they use contrast to change the scene's saturation levels. They work with your scene's existing color values.
I personally like leaving contrastStrengthMax and contrastStrengthMid at 1.0 and boost contrastStrengthMin by just a little bit.
sharpenStrength
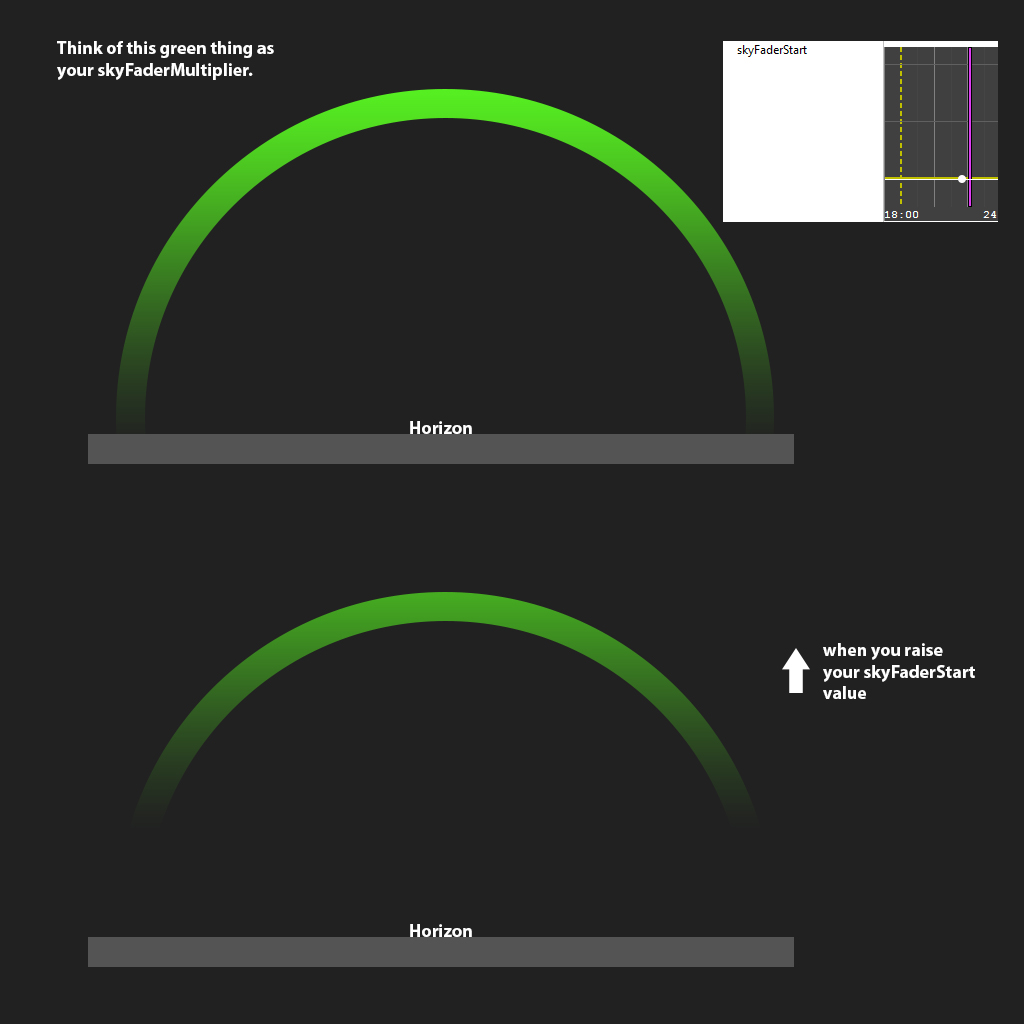
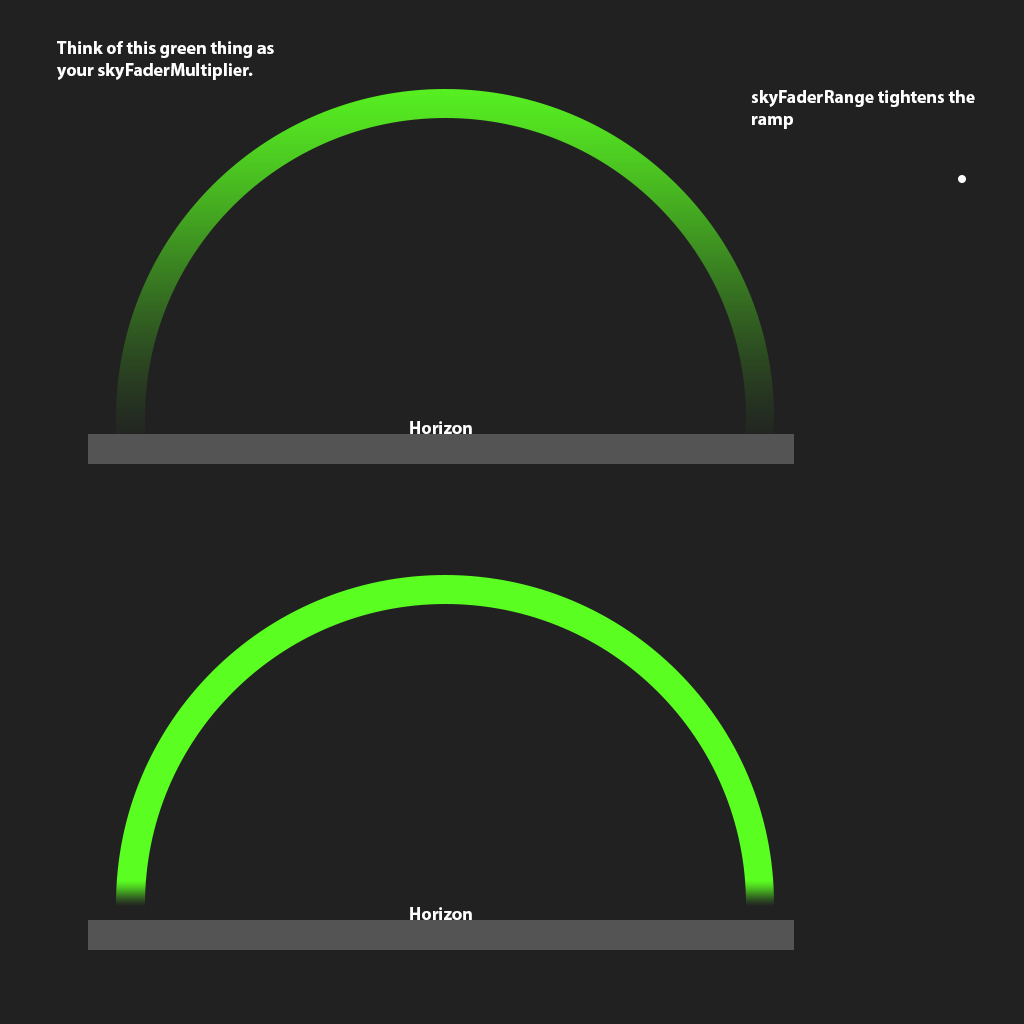
skyFaderMultiplier
I decided to discuss this attribute first because it's easier to understand skyFaderStart and skyFaderRange later on.
skyFaderMultiplier performs a color overlay on your sky. You can definitely use this to enhance the present colors you have for your sky setup so that your clouds and sky will blend together a little bit more. Pushing your keyframe higher will brighten both sky and clouds even further.
skyFaderStart
skyFaderRange
skyFaderContrast
saturates or desaturates your skyFaderMultiplier based on contrast levels. I normally just leave this at 1.0.
m_bloom
brightPassWeights
takes the brightest points of your scene and bleeds them. This parameter works off grayscale strength values.
contrast
affects the color of the bleed when it bleeds into a darker area of your scene.
color
works like a combination of brightPassWeights and contrast but has control over intensity
threshold, thresholdRange, thresholdFlares and thresholdRangeFlares activate the primary bloom and the flare blooms. They make them more "visible" when they are set to very low values a little above 0. The higher their values, the less opaque the bloom becomes. If you are not seeing anything, you must either lift these from 0 or drop them closer to 0.
colorFlare1-5 - these are color flares that attempt to fake lens flares
m_depthOfField
The two most significant parameters that I normally change here are the following:
Intensity - which is basically the intensity of the blurring that will occur.
farBlurDist - which is used to set the distance from the camera that the blur will be affecting.