Table of contents
To attach sounds to your game please follow the steps listed below:
1. Import sounds into FMOD Ex sound system using FMOD Designer tool as an integrated bank that can be seen by the REDengine.
2. Link those sounds to specific game events and mechanisms using REDengine editor
FMOD Ex Designer
FMOD Ex is a very powerfull audio middleware that can play sound and music files according to programmed behaviour and its integrated into the REDengine in the Witcher 2 game.In order to add custom audio to your mod, you will need to download and install the FMOD Ex Designer tool, which is free for personal use.
Here is the link to vesion 4.32.04 which was used by Wicher 2 sound team during game creation:
Click
NOTE: Other versions may not be supported by REDkit.
Assuming that you already have prepared all the sounds that you need for your game, you can import them into FMOD using FMOD Designer tool.
As sound implementaiton is a pretty broad and complicated task, this tutorial will focus primarily on a very basic step-by-step example for beginners. To learn more about integrating audio using FMOD, please refer to the Designer's manual availalable from the Fmod’s Help menu.
Additional in-depth tutorials can be found on the official FMOD youtube channel by following the link listed below:
Click
First portion of our tutorial will focus on an example of preparing a bank containing example sound to be played in game and making this sound 3D with custom volume roll-off on distance of 20 meters.
Add instance of your sound definition to the layer00 by right-clicking on empty grey field and chosing add sound from the menu. Pick your sound definition, set "oneshot" from the "loop mode" area and click ok. You can change loop mode later by right-clicking on sound def instance and entering the Sound instance properties.
Switch the mode from 2d to 3d on the "example" event property view and set the 3d rolloff to custom. Set Oneshot value to Yes.
From Project menu chose Build..., set the platform to PC, then check the box before your bank name on the list and click Build.
As the result of these steps you'll have a sound event called "testing/test/example" available to use inside the REDengine editor.
In the REDengine data/sound directory you will notice two new files:
test.fev – this file contains information about sound definitions and sound events but no actual sound data.
test.fsb – this file contains the sound data only.
Additional info:
Beside "3d distance" there are a few custom parameters which are supported by the REDengine. To use them, just add a parameter and set a proper name in the new parameter’s properties area.
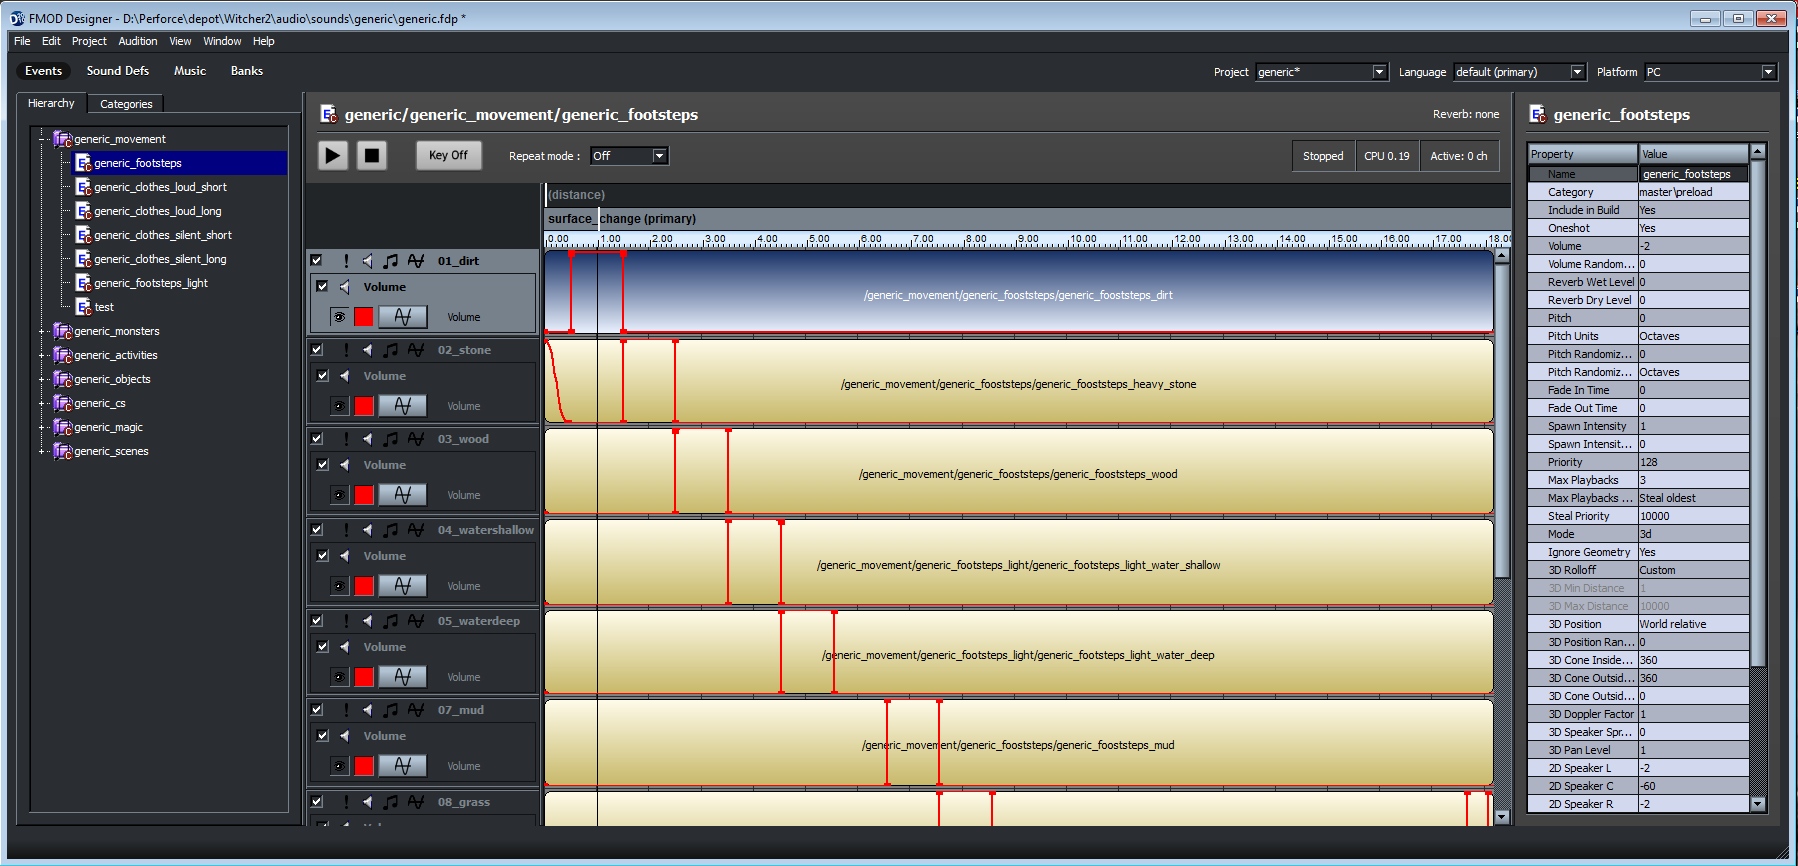
name: surface_change
minimum value: 0
maximum value: 18
units: leave it blank
This parameter can be used to play different sounds depending on the ground material the character is moving on. In other words, this is very useful for footstep sounds.
Values range from 0 to 8 and from 15 to 18.
All you have to do is spread your different sounds on different layers within the same sound event, and then use volume curve as a filter to mask the unwanted sounds at certain parameter values.
name: material_change
minimum value: 9
maximum value: 14
units: leave it blank
This parameter can be used to play different sounds depending on the material of the clothes which a character may wear. Here, values range from 9 to 14.
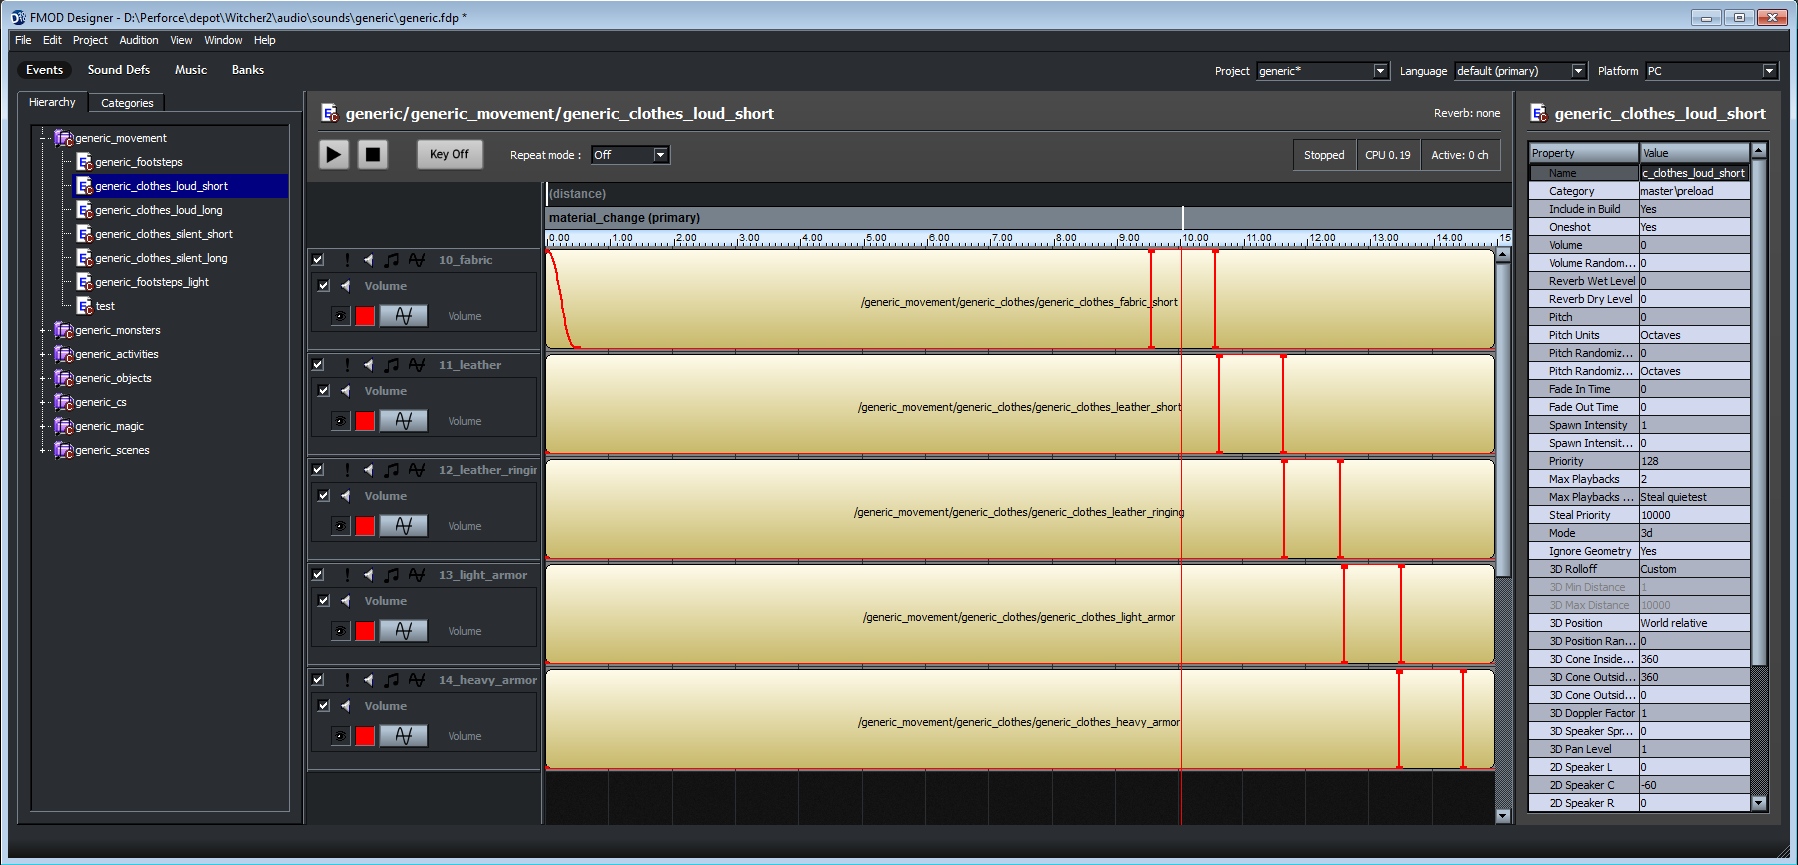
For your reference, provided below is the list of all ground surfaces and cloth materials included in “The Witcher 2”:
0 – None
1 – Dirt
2 - Stone
3 – Wood
4 – Water Shallow
5 – Water Deep
6 – Metal
7 – Mud
8 – Grass
9 – Skin (flesh)
10 – Robe (fabric)
11 – Leather
12 – Leather_ringing (studded)
13 – Light Armor (half plate)
14 – Heavy Armor (full plate)
15 – Sand
16 – Gravel
17 – Carpet
18 – Leaves
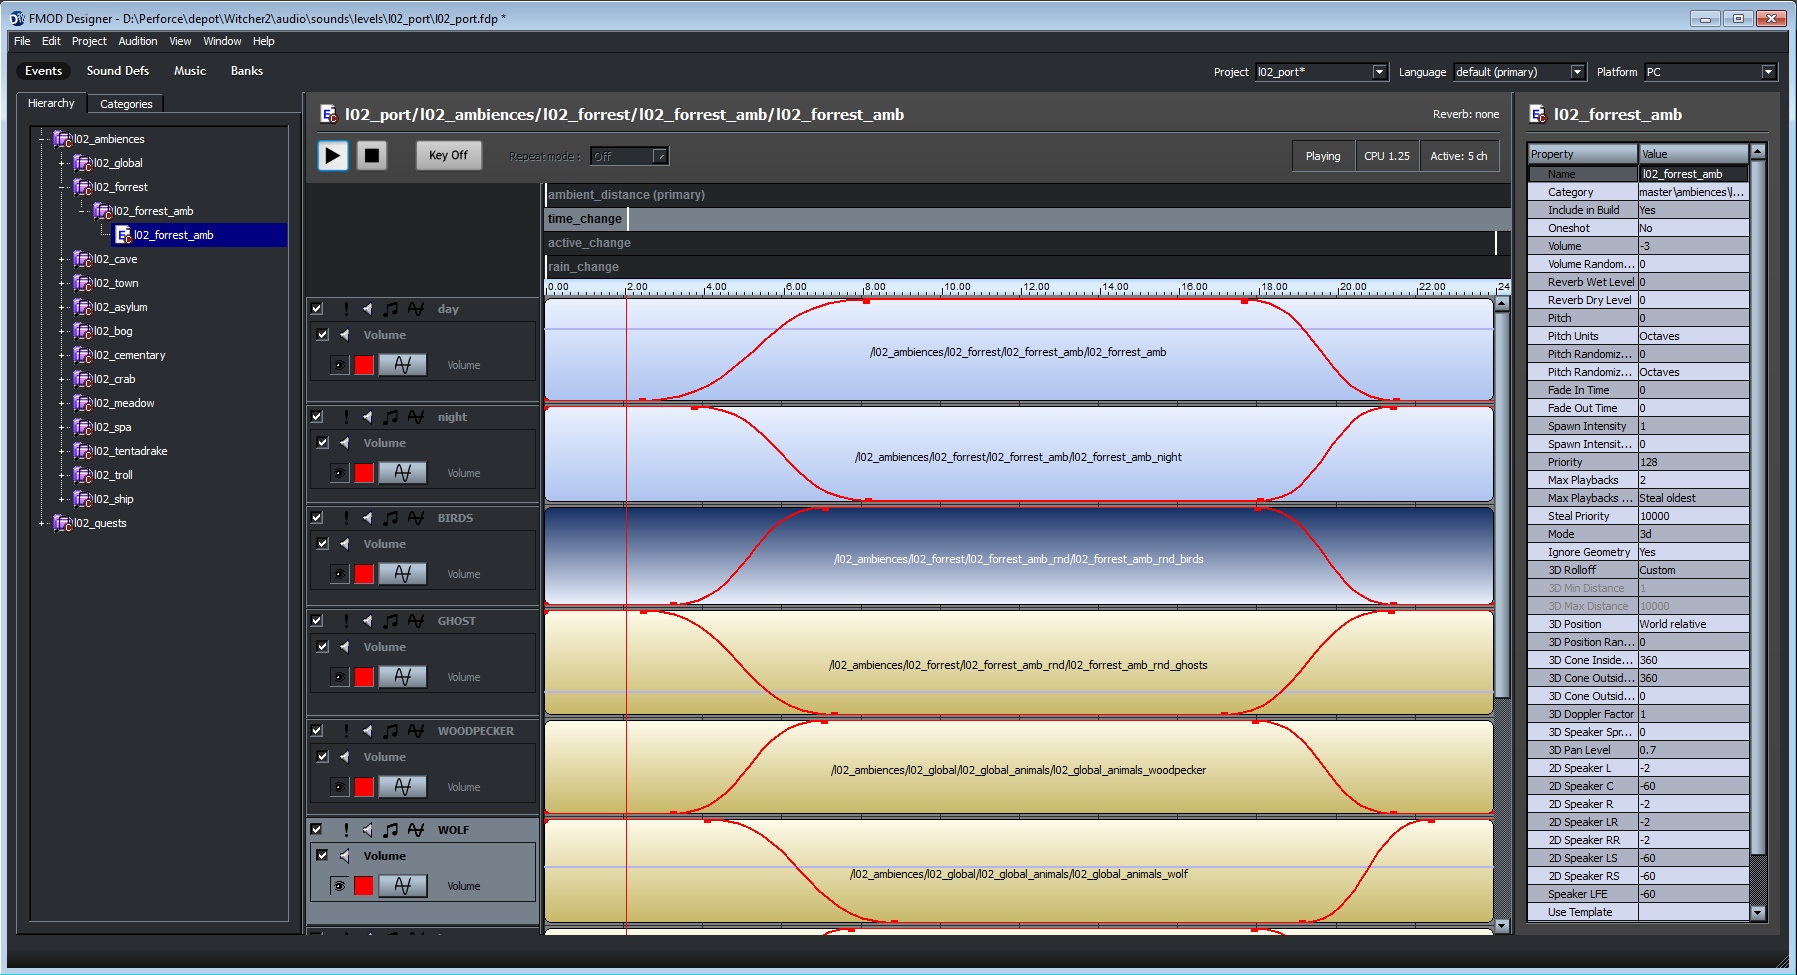
name: time_change
minimum value: 0
maximum value: 24
units: hours
This parameter can be used to dynamically control the change in sound based on a given real-time parameter. A example of using such a aprameter can be found in controling of the ambient/nature sounds which, in turn, are dependant on the time of day.
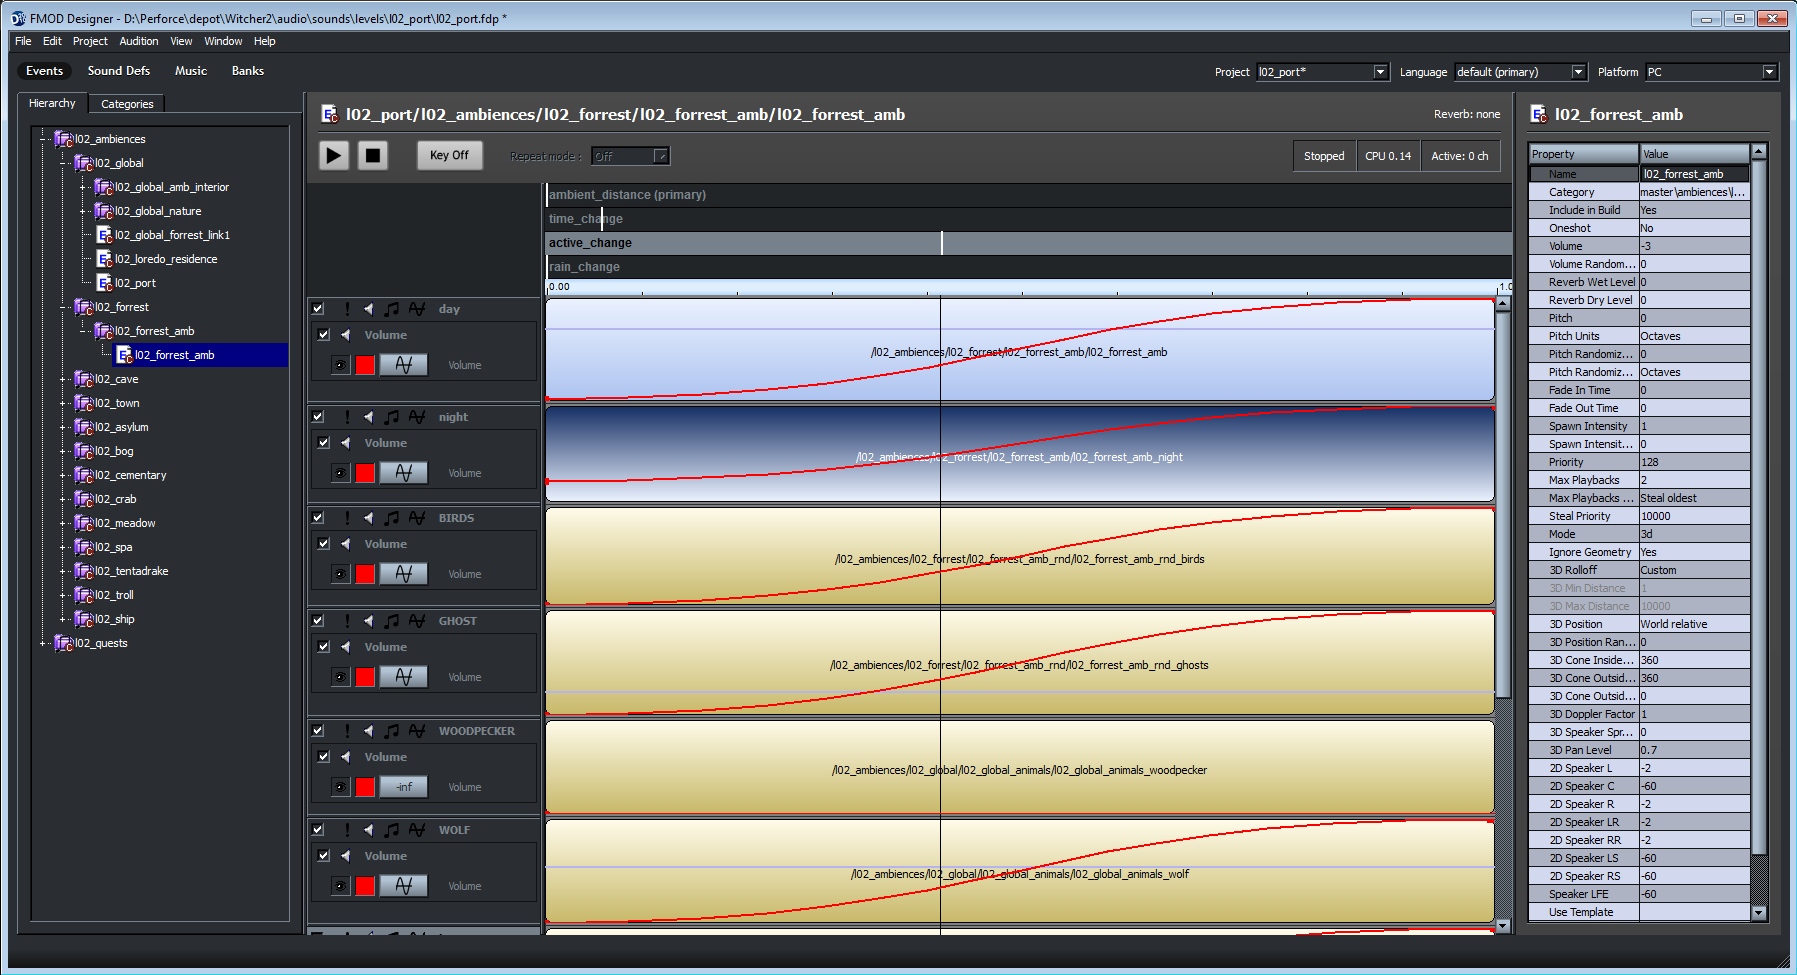
name: active_change
minimum value: 0
maximum value: 1
units: leave it blank
This parameter can be used to control sounds depending on the actual position of the player (0 – outside actual “sound ambient area” , 1 – inside).
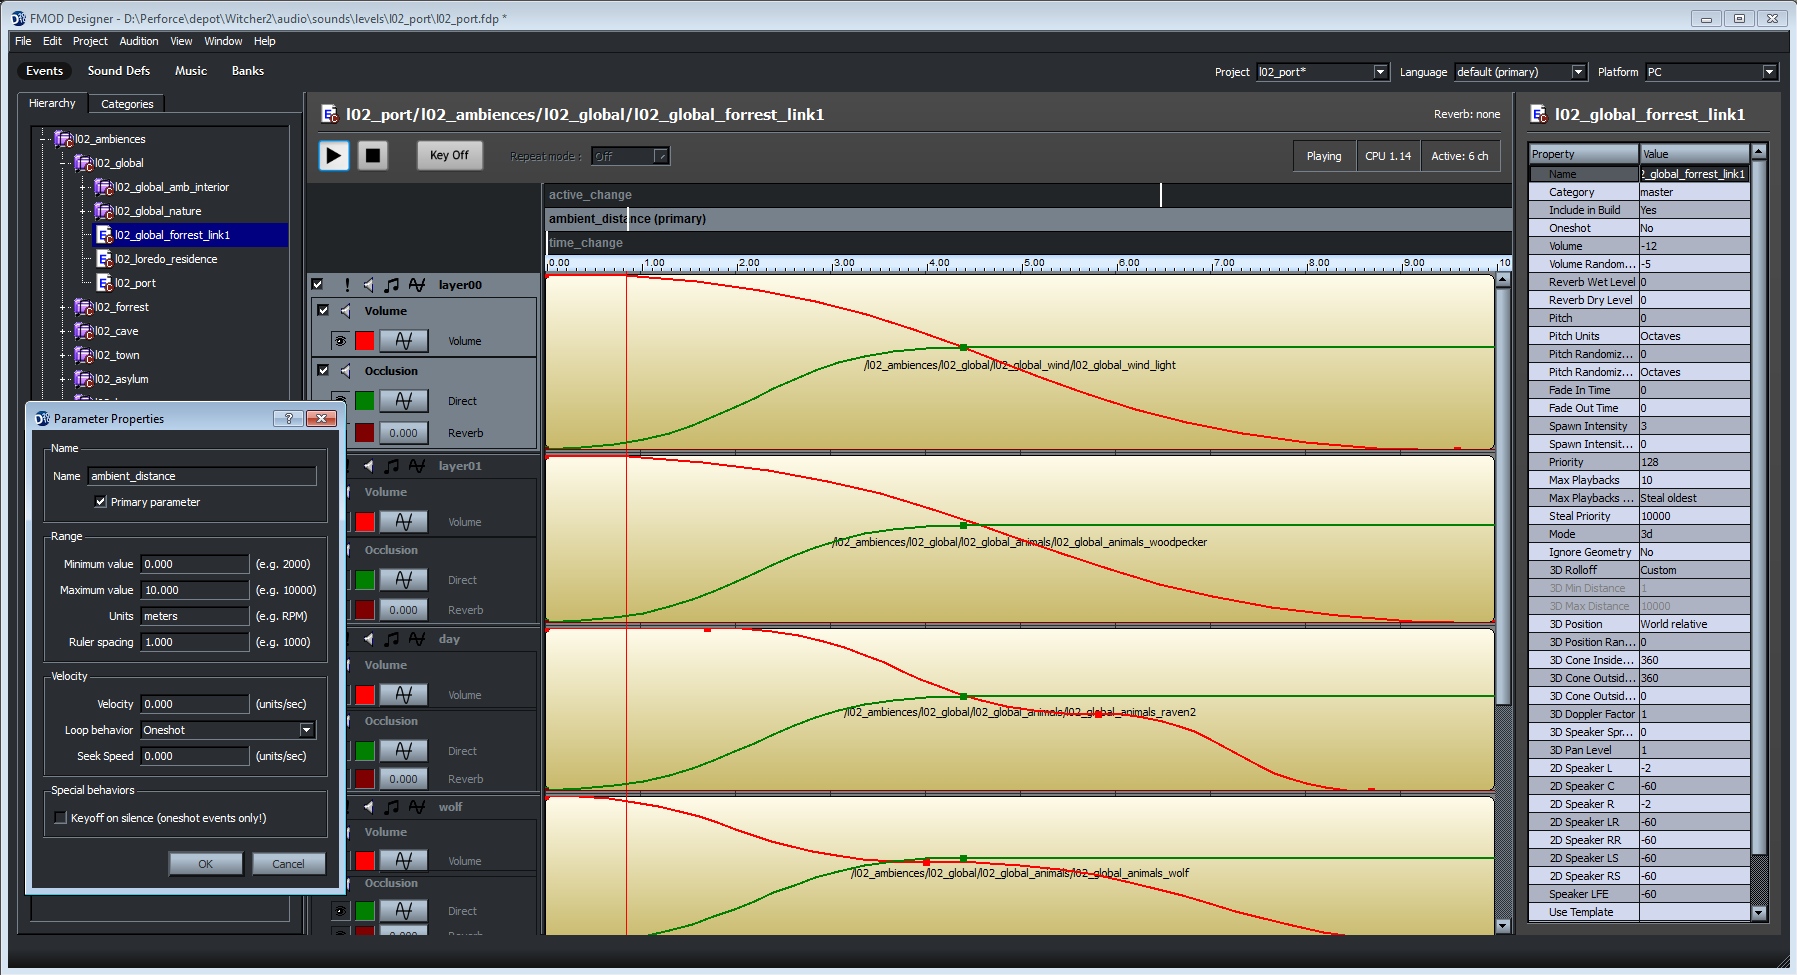
name: ambient_distance
minimum value: 0
maximum value: as needed
units: meters
This parameter can be used to control distance for the ambient sound’s volume roll off
when player is going outside of a given sound’s ambient trigger (see part 2, attaching ambient sounds to triggers).
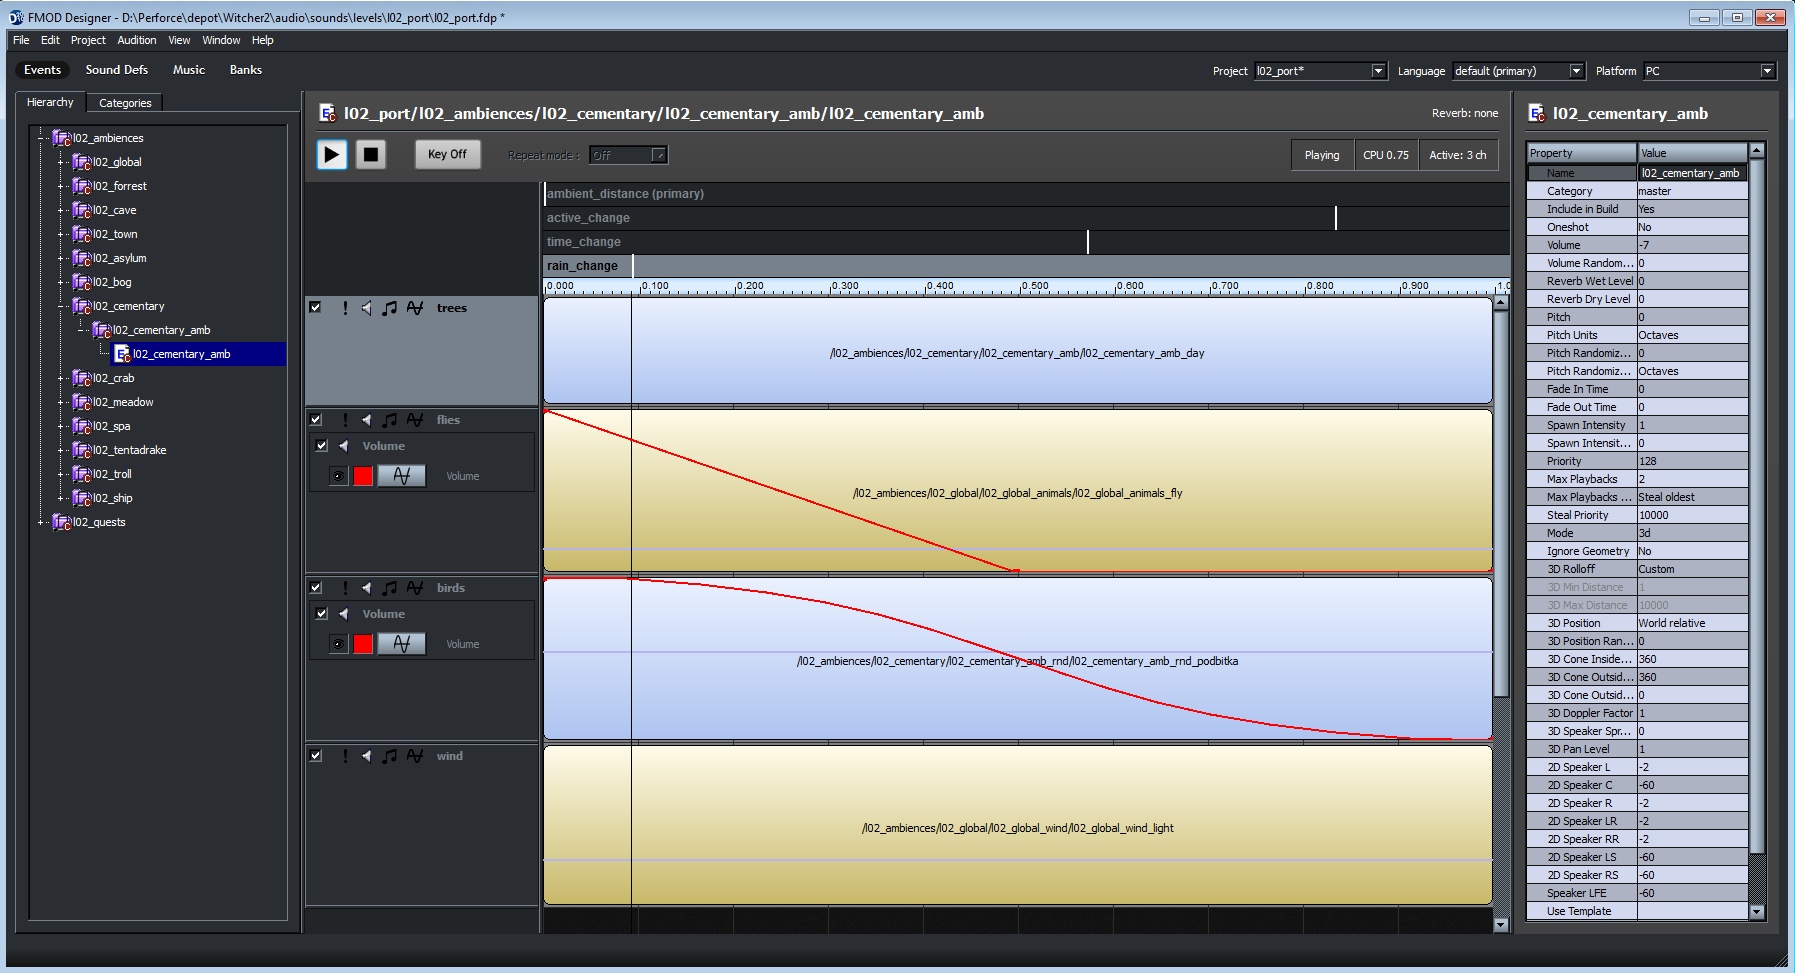
name: rain_change
minimum value: 0
maximum value: 1
units: leave it blank
This parameter can be used to control the volume of all rain related sounds depending on actual rain intensity in game. Its values range between 0 (no rain) and 1 (maximum rain).
REDengine Editor
Depending on the game mechanics that you may need to link sounds events to, you will be using one of the following editors available in the REDengine:
Animation Editor or Events for Animation Editor
World Editor
Entity editor
Cutscene Editor
Scene Editor (dialogue)
A step-by-step guide of linking our example sound to those different game mechanics can be found on the following page.
Animation Editor
This editor is used to insert sound cues into the Red Engine animations.
Please ensure that all sounds used within this editor are non-looping.
Follow the steps listed below to add a sound effect to animation.
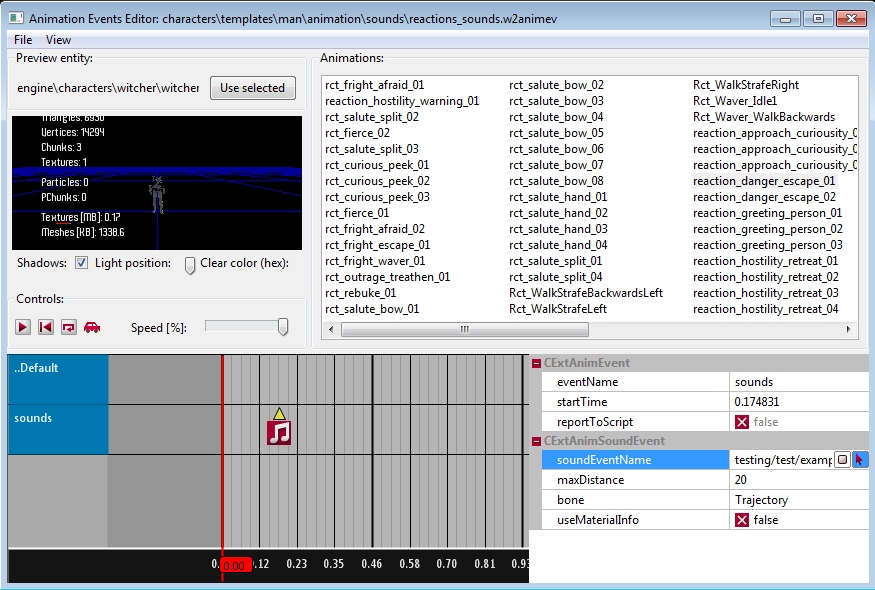
- You can attach the sound to specific bone of your character/object
- You can switch useMaterialInfo property to true if you need to have information about the material of cloth that animated character is wearing. Use it together with material_change parameter described in FMOD part of this tutorial. Remember, that cloth material has to be set up in the character’s entity template. Just open the entity, go to Effects tab and, under Sounds area, modify clothMaterial value.
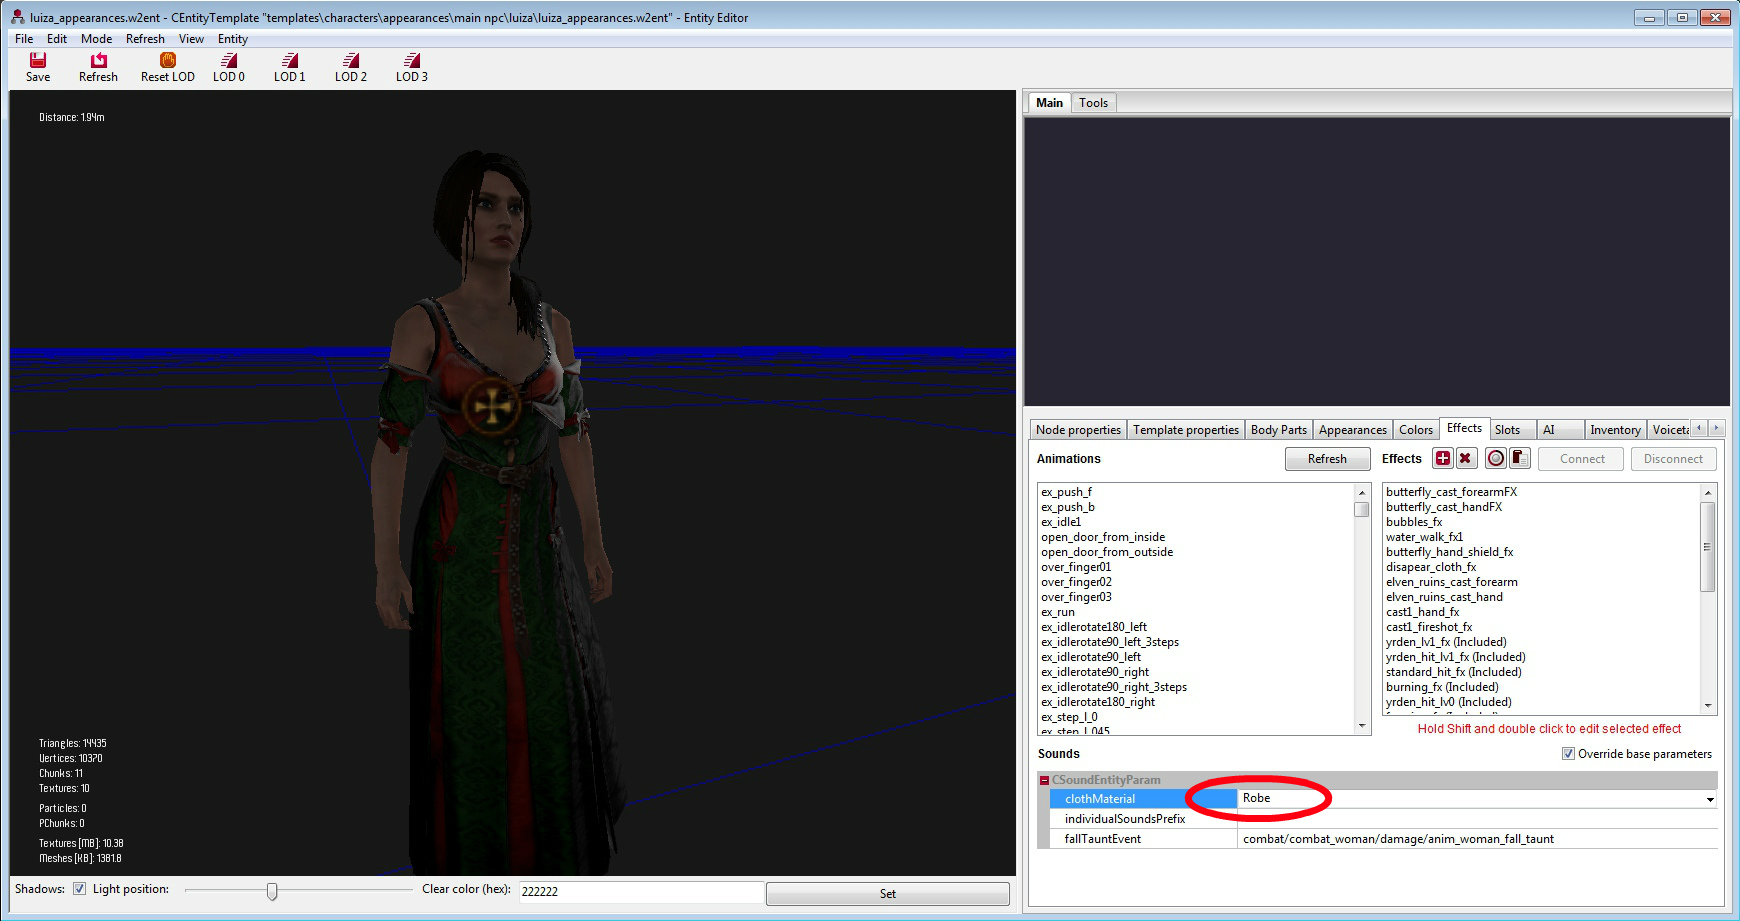
- Play your animation and finetune sound placement by moving it on the timeline.
In addition to regular sound event, there an event called footstep event. Its behavior is almost the same, however footstep event comes with information about ground material under the animated character. Use it together with ground_change parameter described in FMOD part of this tutorial.
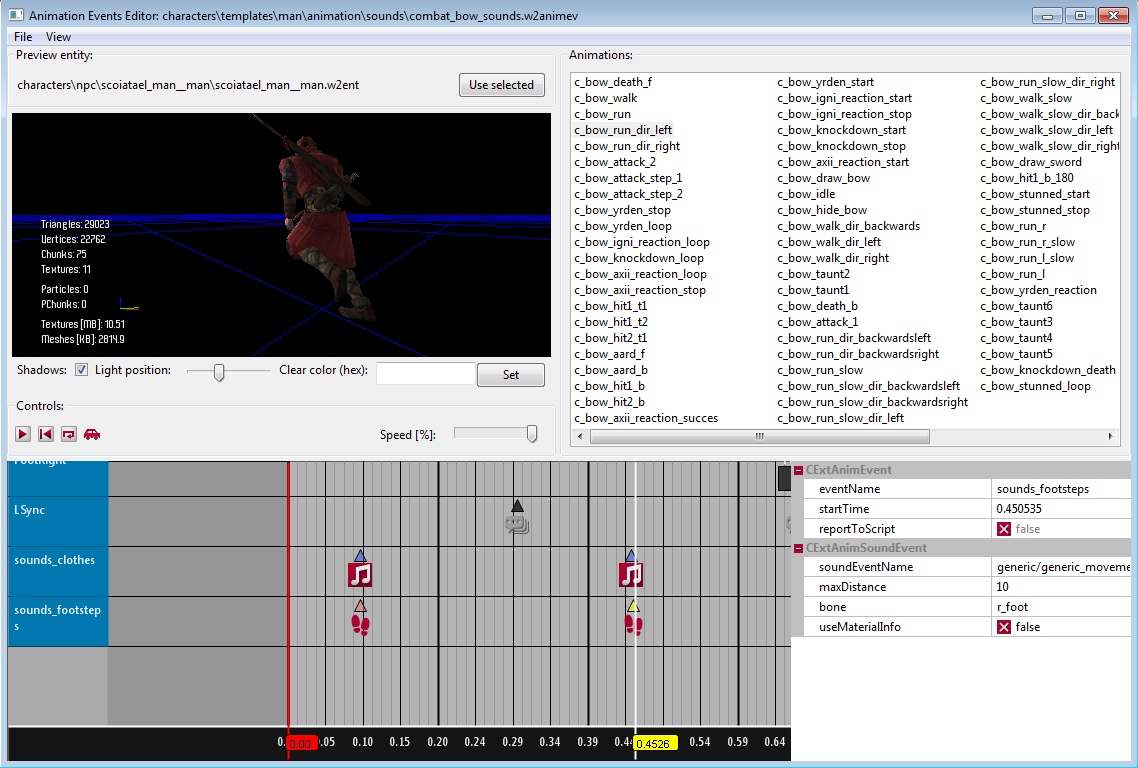
Events for Animation Editor
It is possible to create external event files for your animation sets (that for example will contain only the sound events) and edit the files in this editor just like in the previous one.
To create external events file follow the steps listed below:
- Go to location where you need the file to be placed using Asset Browser, right-click on the background of directory view and choose Create / Events for animation set.
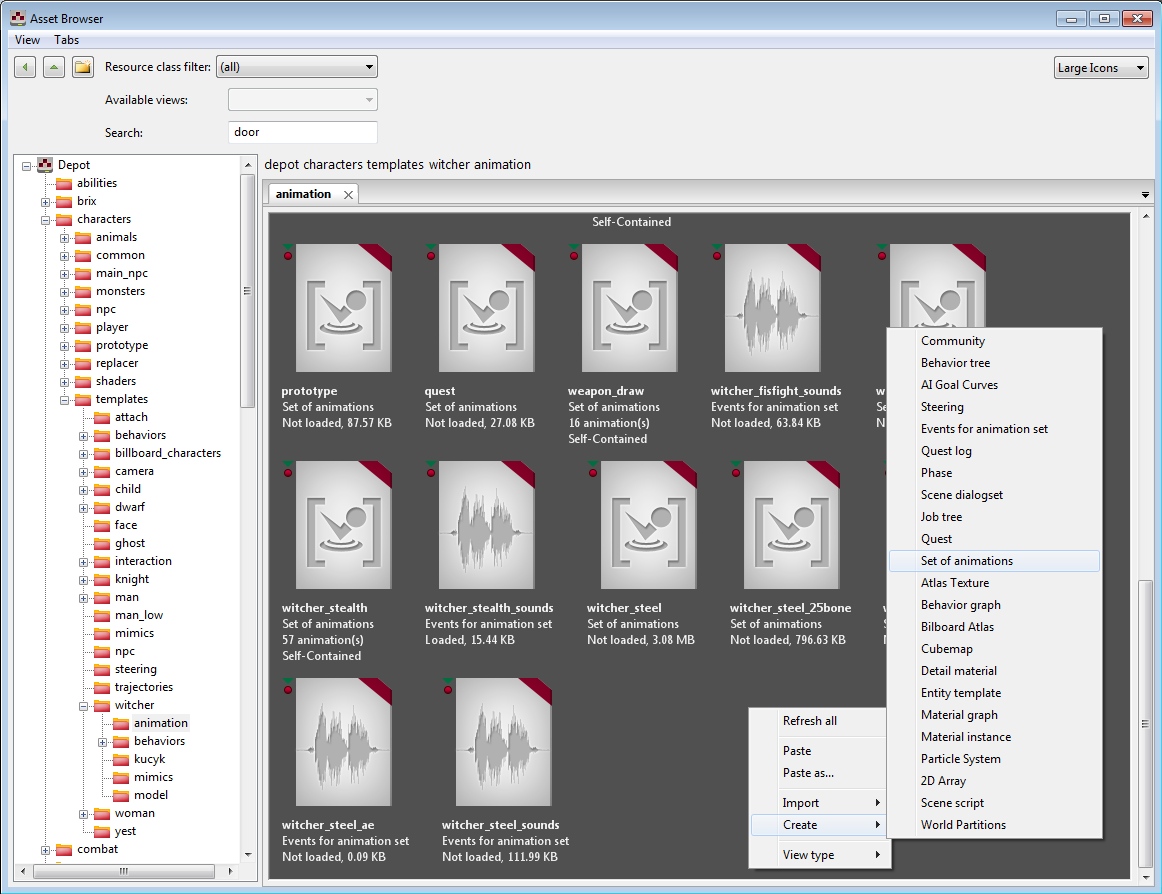
- Name the file, click ok and double-click on file icon.
- Type filename of your animation set file with complete path.
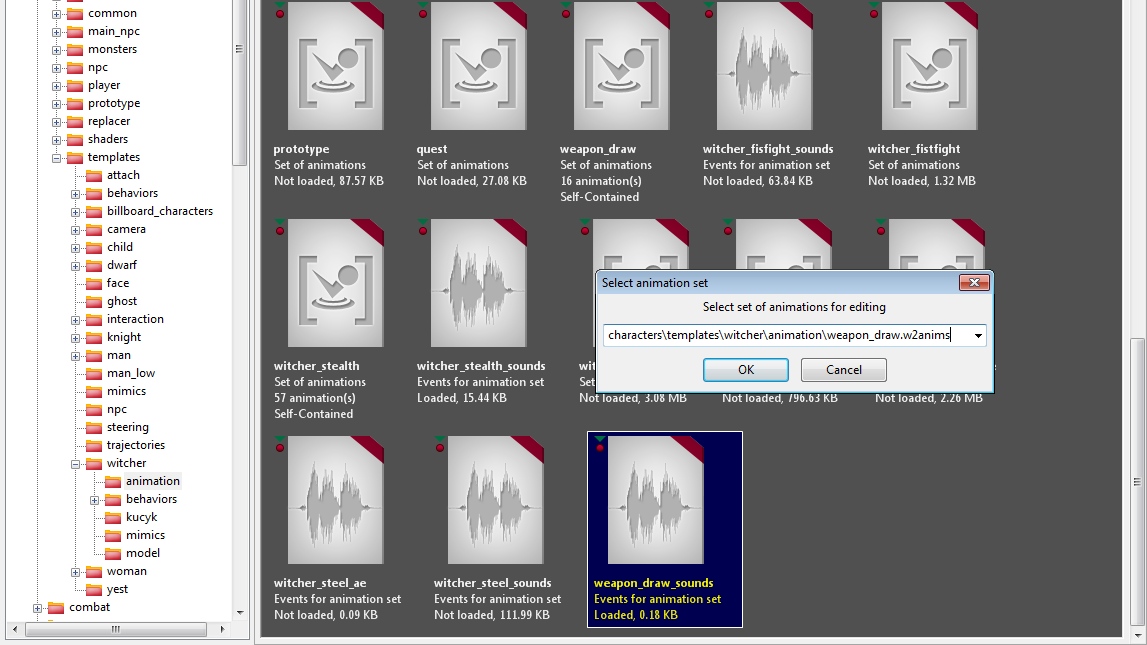
- If needed, choose entity to preview your animations and press Use selected button.
The final step you need to complete is linking your external file (.w2animev) to the main animation file (w2anims).
In order to link your external file to the main animation, folow the steps listed below:
- Open your animation file from the Asset Browser
- Go to Properties tab
- Click on extAnimEvents property and press a green + on the right
- Click on added line (0) and put your external file name with a path in place of NULL (or, in Asset Browser select your external file, go back here, and press green arrow)
- Save your animation file and close animation editor
- From now you can start adding sounds to your external file.
World Editor – linking ambient sounds
You can attach ambient sounds to area objects called Sound Ambient Areas or to point objects called Sound Ambient Emitters. Areas are usually used to play looped stereo files such as wind sound beds, interior base noise, large water areas, etc.
Emitters are good choice for sounds which is played by small objects, such as a lonely tree rustling on wind, small waterfall, etc.
In the event of adding a sound to a Sound Ambient Area, go back to your FMOD project and modify loop mode of your sound definition to “loop and cutoff, then follow these steps:
- Open your world file in REDengine editor.
- In View menu choose Filters Options and under Editor Options / Debug check-in following boxes: Areas, Sound, Sprites and VisualDebug. Go back to main window.
- On the right panel click Scene tab and right-click on World layer group. Choose Add group and set the name to "sounds"
- Right-click on created group folder and choose add layer, name it "ambient_sounds".
- On the main view right-click somewhere on a terrain and choose Sound / Add Sound Ambient Area. It will create yellow box.
- Unfold “ambient_sounds” layer and select soundambientarea0 (you will see your box highlighted). Modify box placement by switching to Move mode (see buttons on the left panel) and using x/y/z modifiers that just appeared inside a box (click on the red, blue and green arrows and drag your mouse).
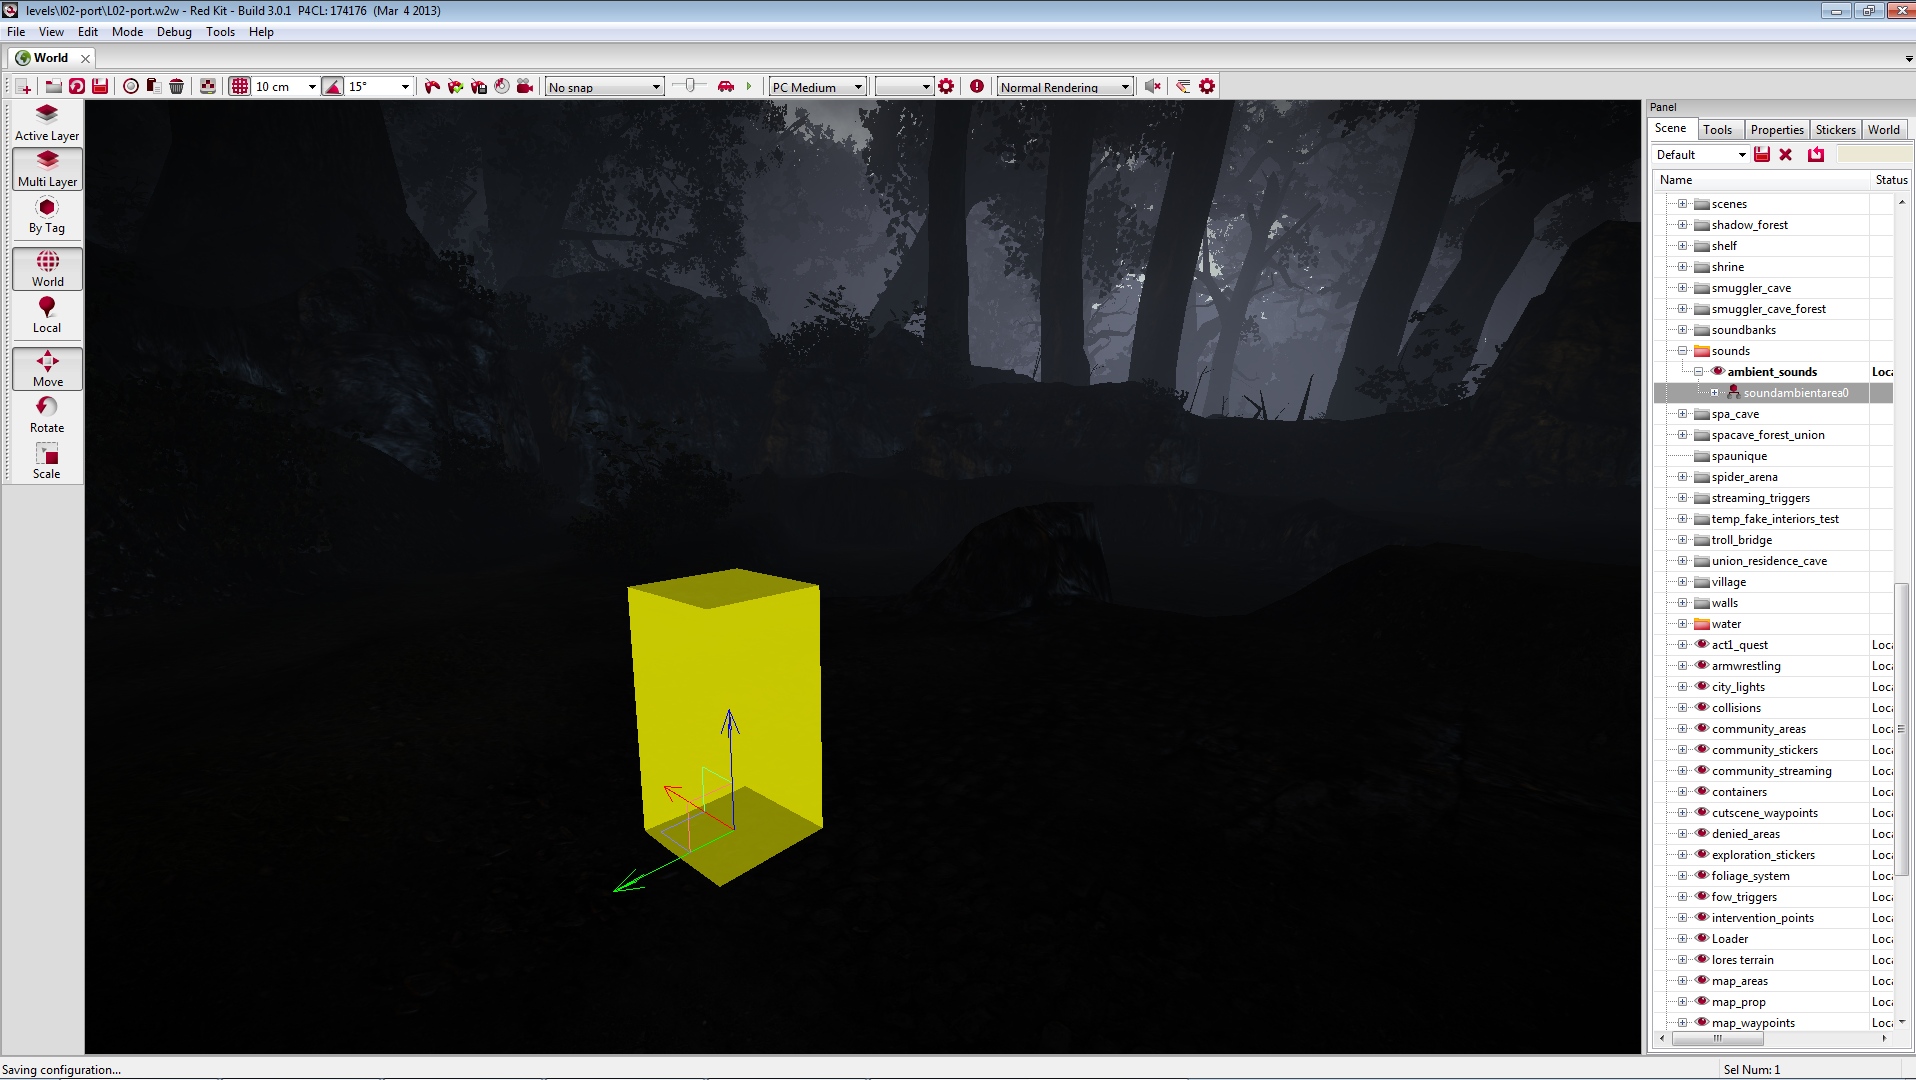
You can also modify size of a box by choosing Scale mode and using small cubes that appeared in place of arrows; as well as its rotation around y-axis by select Rotate mode, and using only blue circle, as a sound area should work only when its on the same horizontal level.
Lastly, you can modify the box even further and change it into an area of great er complexity by using Vertex edit available from Tools tab. You will see that after entering this tool, small circles will appear on each corner of your box. Select these circles one by one and use arrow modifiers to move them wherever you need to. Be aware that whole area should stay on the same horizontal level. To do so, make sure to use red and green arrows only.
To add more vertexes to your shape hold alt key and click somewhere on a bottom edge of the box.
To finish editing vertexes click on Vertex edit button again. An example screenshot of this can be found on the next page.
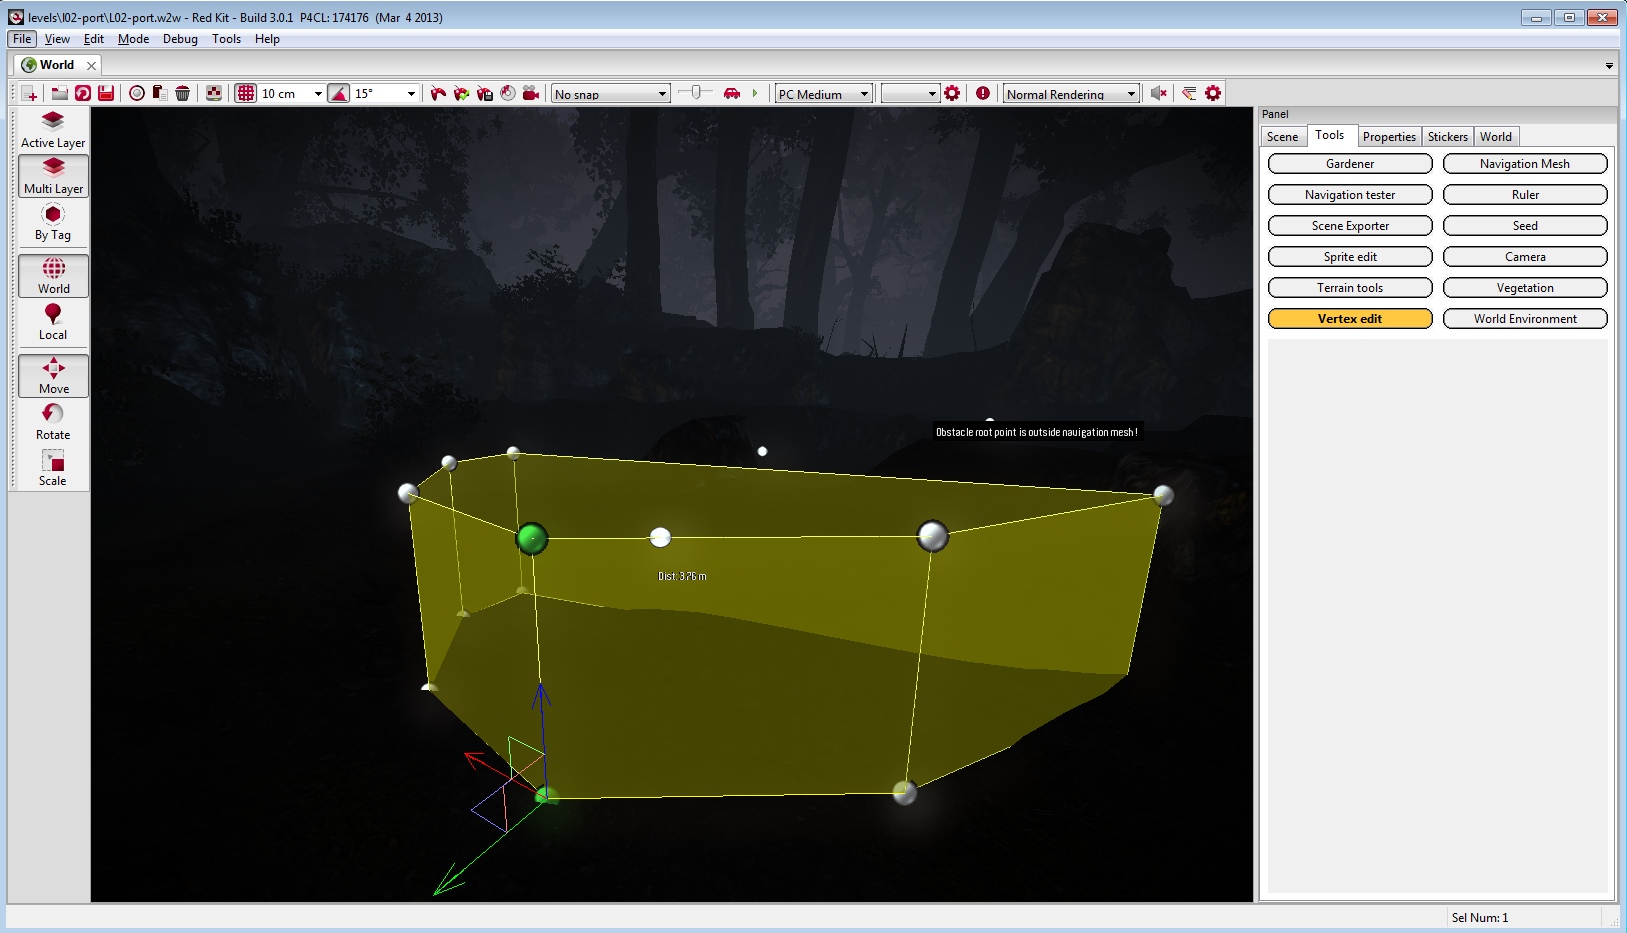
Now you should be ready to link your sound to created area. To do so, follow the steps listed below.
- Switch to Properties tab on the right panel.
- Go to CsoundAmbientAreaComponent and click on soundEvents.
- Click on green + on the right and then on the line below.
- Press small red arrow that appeared on the right and find your sound on Audio Event Browser (open testing / test and click on example).
- Click ok.
- Modify maxDistance value to 20.
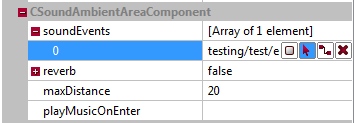
You should be able to hear your sound inside the box as a 2D, and from the outside as a 3D with roll-off on a distance 20 meters.
Attaching sound to Sound Ambient Emitter is very similiar, but you also need to enable each emitter by setting enabled value to true in it's properties.
Entity Editor
You can use Entity Editor to link sounds to visual effects attached to the entity file (.w2ent).
Sounds can be one-shot or looped (stopping visual effect will end the sound automaticly with some fade out)
To link sounds to visual effects follow the tutorial steps below:
- Open (double-click on) your entity file using the Asset Browser
- Go to Effects tab
- Double-click on effect with shift key pressed
- Right-click on the grey area below the last track group name, choose Insert track group and name it "sounds"
- Right-click on the track group bar and choose Append track, name it "sound_events"
- Unfold "sounds" track group and right-click somewhere on timeline on "sound_events" track. Choose Add track item / CFXTrackItemSoundEvent
- Double-click on created event (triangle icon), go down to find preferences table – enlarge editor window if you can't see it, as it's hidden below
- Click on soundEventName to attach your sound.
- Modify maxDistance value as needed.
- Finetune sound placement by moving it on the timeline.
Cutscene Editor
You can use this editor to link sounds to cutscene files (.w2cutscene)
It is very similiar to working in animation editor. The only difference is that you can attach sounds to a specific actor on a scene (chosen from the list on Cutscene tab)
Scene Editor (dialogues)
You can use this editor to link sounds to scene file (.w2scene)
Beside the dialogue audio, you can place regular sound events on the timeline, and attach them to specific actors.
