Community Editor is a tool used to spawn characters (and occasionally monsters), create their day/night cycles, etc. It is divided into a few tabs that will be described here.
 ).
).
It comes in handy when your Character Entity has checked i.e. 12 different appearances from which every character spawned from this entity is then randomly choosing one of those 12 appearances. BUT we don't want that, we want him to always spawn with appearance citizen_poor_7. So instead of creating another entity with only 1 appearance checked, we fill out this field in Community Editor and just type our desired appearance name (in this case it would be citizen_poor_7).
We can also add more than 1 appearance in this field, and that means that when the character is spawned it will choose one by random from those 2 appearances that we typed in (instead of default 12 appearances checked in the Entity).
Note: If you fill this field, all of the tags defined inside Character Entity will be ignored and swapped to those defined in Community Editor.
• CMPT_None - standard mappin with exclamation mark icon.
• CMPT_Inn - Mappin icon symbolizing Inn
• CMPT_Shop - Mappin icon symbolizing vendor NPC
• CMPT_Craft - Mappin icon symbolizing crafting NPC

A window will pop-up:

After clicking the blue arrow another menu will pop-up with available script functions. You will be able to find the description of said functions in Quest Editor chapter.
Every character entity verse can have multiple story phases. For example this is a screenshot of Vernon Roche community file:

Note: if Start In AP is True, then this field becomes void (and there is no reason why you should fill it up, if you are using action points).
Note: If this field is left blank, and NPC will get a command to despawn he will disappear immediately in place where he stands at the moment.
Uses Last AP
If true, than NPC will keep working in action point where he first started. If we want to create patrolling NPC's this has to be false.
In world editor, select your desired layer, double click it should turn bold:

Now, go back to the Timetable sheet, and in Layer name click the include button ( ).
).

This means that this woman, will (from 15:00) by random do one of those 3 defined categories. How this work in engine:
spawn NPC → find Layer defined in Layer Name → find categories defined in Category → by random choose 1 → find an Action Point on the given layer with the chosen Category.
Note: Category defined here HAS TO BE the same as the one defined in Action point on the given layer. Otherwise NPC WILL NOT WORK IN HIS ACTION POINT.
Table of contents
- Spawnset
- Comment
- Entry ID
- Entity Template
- Appearances
- Weight
- Entity Spawn Tags
- Mappin Tag
- Mappin Type
- Initializers
- Is Hidden Spawn
- Commentary
- Story Phase Name
- Time
- Quantity
- Respawn Delay
- Don't Respawn
- Timetable Name
- Spawn Delay
- Spawn Point Tags
- Despawn Point Tags
- Start In AP
- Always Spawned
- Is Background
- Cached map pin
- Spawn Strategy
- Timetables
Spawnset
Comment
Comment field lets you enter information for you and your colleagues regarding entity that this whole verse line corresponds to.Entry ID
This is an ordinal field where you can put the name of your NPC. Name that you will put here will have NO EFFECT anywhere, it's just to keep things tidy for a designer.Entity Template
In this field we include the character entity we want to spawn. You can do it by selecting your desired character entity in Asset Browser and then in Community Editor, in Entity Template field you click the include icon ( ).
).Appearances
This field purpose is to exactly pinpoint what kind of appearance your character entity should have.It comes in handy when your Character Entity has checked i.e. 12 different appearances from which every character spawned from this entity is then randomly choosing one of those 12 appearances. BUT we don't want that, we want him to always spawn with appearance citizen_poor_7. So instead of creating another entity with only 1 appearance checked, we fill out this field in Community Editor and just type our desired appearance name (in this case it would be citizen_poor_7).
We can also add more than 1 appearance in this field, and that means that when the character is spawned it will choose one by random from those 2 appearances that we typed in (instead of default 12 appearances checked in the Entity).
Weight
This is an unused field. Will be deleted in future iterations of the Community Editor. DO NOT TOUCH, leave it at 1 :]Entity Spawn Tags
In this field we can assign unique Tags to the entity we spawn in this verse. You can add multiple tags here. So assigned tags overwrite tags assigned in entity template.Note: If you fill this field, all of the tags defined inside Character Entity will be ignored and swapped to those defined in Community Editor.
Mappin Tag
This tag corresponds with the field Mappin in Journal Editor.Mappin Type
This dropdown list enables you to choose between 4 different mappin icons. They are:• CMPT_None - standard mappin with exclamation mark icon.
• CMPT_Inn - Mappin icon symbolizing Inn
• CMPT_Shop - Mappin icon symbolizing vendor NPC
• CMPT_Craft - Mappin icon symbolizing crafting NPC
Initializers
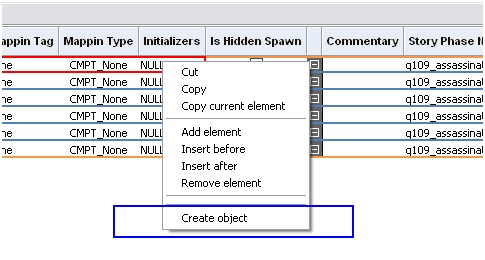
This is a very helpful field. It allows you to assign a specific script action as soon as the NPC is spawned without quest scripting. Another good thing is that the NPC gets to executing assigned task almost without any delay. So to set up an initializer you right click on the Initializers field and choose Create Object.
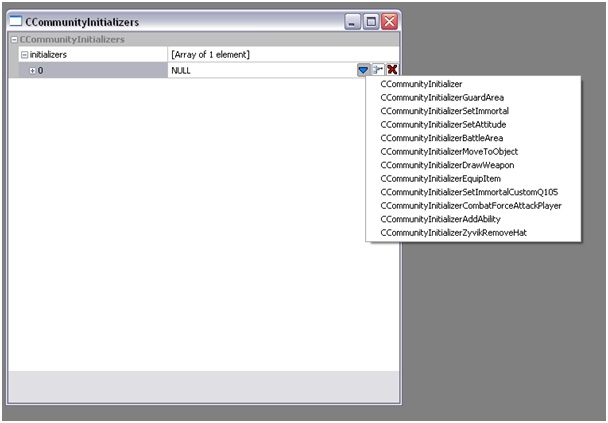
A window will pop-up:

After clicking the blue arrow another menu will pop-up with available script functions. You will be able to find the description of said functions in Quest Editor chapter.
Is Hidden Spawn
If this is check as true, it means that the NPC will always spawn outside of camera's field of view. Important quest NPC's should have this left unchecked.Commentary
It's another commentary field, self explanatory.Story Phase Name
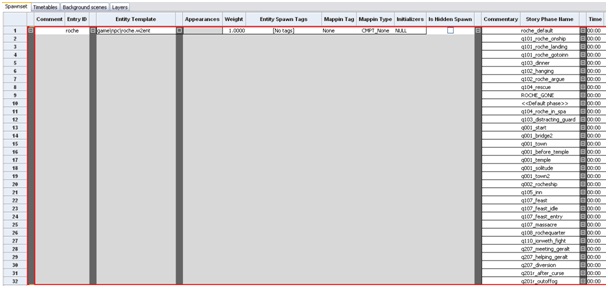
The name of the story phase that NPC will have their work assigned to. This should preferably be named with the number of the quest in the beginning followed by an underscore and explanatory name of the faze, regarding what this NPC will be doing. i.e. q109_sneaking_garden.Every character entity verse can have multiple story phases. For example this is a screenshot of Vernon Roche community file:

Time
This field is used to manage the quantity of NPC's regarding the present hour in the world.Quantity
Amount of NPCs spawned from this verse. If we put 2 here, that will spawn 2 NPCs from the character entity assigned in Entity Template field.Respawn Delay
The time that has to flow from death of this NPC to his respawn.Don't Respawn
Self-explanatory, if true, than once this NPC is killed he will never respawn again.Timetable Name
This field is corresponds to the Name field in Timetable sheet in Community editor. Basically it means what timetable will be activated once the Story Phase in this verse is activated.Spawn Delay
Amount of time that has to go by from spawn command (by story phase setter in the Quest Editor) to actual appearing of the character in game.Spawn Point Tags
Here we can put in the tag of a waypoint where our character should spawn. Spawning NPCs in waypoints won't make them work in action points (this happens only by defining the Timetable), they will only appear in given location and be Idle.Note: if Start In AP is True, then this field becomes void (and there is no reason why you should fill it up, if you are using action points).
Despawn Point Tags
Here we can put a tag of a waypoint/actionpoint where NPC will go to before despawning (after being given the command do despawn by Story Phase Setter in quest editor).Note: If this field is left blank, and NPC will get a command to despawn he will disappear immediately in place where he stands at the moment.
Start In AP
If true, than NPC will spawn in action point defined in his Timetable.Uses Last AP
If true, than NPC will keep working in action point where he first started. If we want to create patrolling NPC's this has to be false.
Always Spawned
If true, NPC will never turn into a stub (his graphical and script components will always be fully loaded no matter how far away are we from this particular NPC). This should be checked true only for Quest NPCs that there is a risk of losing the quest signal if the character turns into a stub.Is Background
If true, the position on the world of this NPC will NEVER be saved. This is used for background community NPCs mostly but also to NPCs who don't move around, just stand in 1 action point.Cached map pin
This field fills itself automatically when resaving community file on level with spawnpoints/actionpoints. Do not worry about it :]Spawn Strategy
This allows you to define the radius from the NPC to the player on which the NPC will be spawned/despawned.Timetables
Name
This field is corresponds to the Timetable Name field in Spawnset sheet in Community editor. The name preferably should start with the quest number followed by an underscore and an explanatory name, i.e. q101_roche_argue.Time
This field is used to manage the daily cycle of routines of an NPC. You can set different jobs in different action points in time intervals divided as you please(you can make intervals every hour, even every minute).Layer Name
Here you assign the layer with the desired action point. You do it by:In world editor, select your desired layer, double click it should turn bold:

Now, go back to the Timetable sheet, and in Layer name click the include button (
 ).
).Category
This is a job category that we want our NPC to execute. Job category is defined in Action Point editor (see the right chapter on more info). There can be more than 1 category i.e:
This means that this woman, will (from 15:00) by random do one of those 3 defined categories. How this work in engine:
spawn NPC → find Layer defined in Layer Name → find categories defined in Category → by random choose 1 → find an Action Point on the given layer with the chosen Category.
Note: Category defined here HAS TO BE the same as the one defined in Action point on the given layer. Otherwise NPC WILL NOT WORK IN HIS ACTION POINT.
