
Action points are waypoints in which characters play pre-defined animations (which are defined in Job Tree editor).
To have a proper, working JobTree, we need to create a Job Tree file, set at least one category and animations we want to be used. After opening job tree we click on in the left tab and in the middle tab we see its properties:
• Valid Categories: array of action point categories – used in Community timetable.
• Selection Mode:
• Left Item/Right Item: we choose what item in which hand should be placed
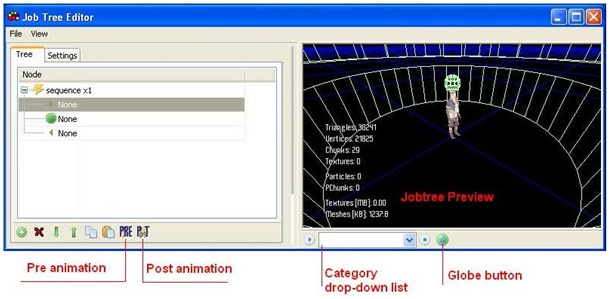
Next we right-click on and choose “Add enter animation”. On newly created node we right-click and choose “Add child node”. On the top we right-click and choose “Add leave animation”. On the child we right-click and choose “Add enter animation”. We’ve created a simple job tree.
Now we click on first child (it will be pre- animation) and on the middle tab we have:
• category name: we define which set of animation should be used for this node (to create a category name, we need to open globals/animations.csv, add a category name in friendlyName and path to animation set in animsetDepotPath)
• Anim Name: choose which animation should be played (animations that should be played on the beginning have names with “start” in it)
• Anim Blend In/Out: defines how long the blends between previous and next animation should be
• Is Lookat Enabled: defines if NPC will have lookat on player when playing this animation
• Place: not used
• Disable Path Agent: if true, NPC won’t be pushed out from AP if there’s collision (used for action points like sitting at the desk
In the settings tab we have:
• Left/Right Remove at end: defines if at the end of action (whole sequence of animations) NPC will remove item from his hands
• Left/Right Drop on break: defines if when breaking the action, NPC will drop item from his hands
• Can React: defines if NPC during action will have any reaction on player (reactions are defined in NPC entity template)
Table of contents
Creating new actionpoint
To create an Action Point we need to create an Entity. We must set its class to CActionPoint and add CActionPointComponent. In CActionPointComponent properties we need to link JobTree file to jobTreeRes.
To have a proper, working JobTree, we need to create a Job Tree file, set at least one category and animations we want to be used. After opening job tree we click on in the left tab and in the middle tab we see its properties:
• Valid Categories: array of action point categories – used in Community timetable.
• Selection Mode:
- SM_SEQUENCE – animations will play in order, from top to bottom.
- SM_RANDOM – animations will play randomly.
• Left Item/Right Item: we choose what item in which hand should be placed
Next we right-click on and choose “Add enter animation”. On newly created node we right-click and choose “Add child node”. On the top we right-click and choose “Add leave animation”. On the child we right-click and choose “Add enter animation”. We’ve created a simple job tree.
Now we click on first child (it will be pre- animation) and on the middle tab we have:
• category name: we define which set of animation should be used for this node (to create a category name, we need to open globals/animations.csv, add a category name in friendlyName and path to animation set in animsetDepotPath)
• Anim Name: choose which animation should be played (animations that should be played on the beginning have names with “start” in it)
• Anim Blend In/Out: defines how long the blends between previous and next animation should be
• Is Lookat Enabled: defines if NPC will have lookat on player when playing this animation
• Place: not used
• Disable Path Agent: if true, NPC won’t be pushed out from AP if there’s collision (used for action points like sitting at the desk
In the settings tab we have:
• Left/Right Remove at end: defines if at the end of action (whole sequence of animations) NPC will remove item from his hands
• Left/Right Drop on break: defines if when breaking the action, NPC will drop item from his hands
• Can React: defines if NPC during action will have any reaction on player (reactions are defined in NPC entity template)