
Scene editor is a tool used to write and implement dialogues. A dialogue created in this editor can be used later in game.
Dialogue sections are parts of whole dialogue – each section is shown in scene graph part of editor as a single block.
NOTE: To add a new section click RMB in dialogue sections window or scene graph window, and choose right option from the list.
After adding a section you will notice, that a new block will be added in scene graph window. In this window you define logical construction of the dialogue. The signal (which means, what is currently played/processed in game) will flow from the Input block, to the Output block (where it exits from the scene). When signal goes through a connection into a dialogue section it means, that this section will be played.
Every section can consist of any number of dialogue lines, for each line you define Voicetag (id of actor, who is supposed to talk) and write text he is supposed to say.
You can also put one dialogue choice per every section, which will always be placed on the end of the section. The reason for that is, each choice adds new outputs to the dialogue section (as you will notice on the scene graph). When player chooses a choice, the signal in the graph exits through the chosen output.
Aside from dialogue sections, inputs and outputs, you can also add script blocks and conditions in scene graph window. A script block allows you to use any script written in Script Studio or C++ inside the dialogue (for example, a script adding a fact to the facts DB). A condition allows you to control flow of the signal in dialogue, for example: you can if player has a certain type of item.
Each block you add has its own properties, which can be edited in properties window. Most important properties for scenes will be listed below.
Global scene properties (edited when you have no blocks selected):
•additionalVoicetags – here you define voicetags of actors, who will take part in dialogue but have no spoken lines.
•mayActorsStartWorking – important flag for gameplay dialogues only. Defines if actors taking part in dialogue can work in their actionpoints while talking.
Dialogue section properties (edited when you select dialogue section):
•isGameplay – this flag defines if dialogue section is to be played as cinematic dialogue (with all characters in defines slots, without possibility of movement, with defined cameras) or as a gameplay dialogue (in form of oneliners / subtitles, without blocking player and NPCs)
•hasCinematicOneliners – option for gameplay dialogues only, it defines if text should be displayed above NPCs head, or as a subtitle on screen.
•pauseInCombat – if checked true, dialogue will pause if combat starts, and will be unpaused after combat ends.
NOTE: it is advised to use on gameplay dialogues only.
•canBeSkipped – cinematic dialogue flag only, if checked true dialogue lines will be skippable.
•numberOfInputPaths – by default this property has value of 1. If value is more than 1 you will notice, that dialogue section block will have new input and output (they will be numbered automatically). It is used for advanced control of signal flow in dialogue, if signal enters through input1 it will exit from output1, if it enters though input2 it will exit through output2, and so on.
NOTE: This won’t work if you have choice in dialogue section.
Last, but not least, there are cutscenes. Cutscenes can be played from the scene file, to add a cutscene you simply add cutscene block in scene graph window and link a proper cutscene from Asset Browser in cutscene block properties. Cutscene sections can be edited in Dialogue Sections window just as any other dialogue section.
•Must Use Context Actor – this flag is important when making Voicesets, if scene is supposed to be a Voiceset it must have this option on true.
•Invulnerable – this flag defines if NPC is supposed to be immortal for the time of dialogue.
•Left item / Right item – in here you can add an item from droplist, which is supposed to be in NPCs hand during the dialogue.
•Voicetag – this field is obligatory, it defines a Voicetag (Voice id of an NPC) for the whole line.
•Actor Tags – this field is to be used only, if your NPC has an unique tag, and if you want game to find him by this tag. This flag is optional.
•Actor template – this field is used for two purposes: first, when the game will be searching for a fitting NPC to play a dialogue, it will check if potential NPCs are spawned from this template. Second, if game won’t find an NPC to play a dialogue, it will spawn a new one from this template, for the time being of dialogue only.
NOTE: This flag is optional, but it is advised to use it as failsafe.
•Appearance filter – this option allows you to define appearance name, which searched NPC will be required to have. This flag is optional.
•Dont Search By Voicetag – this option forces the game to search for NPC using filters other than Voicetags, such as Tags, entity template, and appearances.
NOTE: If you leave this column empty, dialogue will either play in random position, or in the place of pivot (described later on).
You can also change type of setting for your dialogue (default is 4vs4), by linking from Asset Browser another type of setting into Dialogset column.

Second part of this tab consists of options, which allow you to put every NPC in desired positions. Each slot in a dialogset has its own id number, which can be seen when putting Scene Waypoint on level. In slot number column you define this very spot for each NPC (Voicetag column).
NOTE: Putting same slot number for two NPCs or leaving this column empty will generate bugs.
If Is Pivot flag is checked true, the dialogue will be played where the NPC that is pivot is standing.
NOTE: If you have defined both scene setting tag and Is Pivot, then Is Pivot flag will be ignored.
If Is Hidden flag is checked true, targeted character will be invisible in dialogue until he plays enter animation. Also, he won’t be visible anymore after playing exit animation.
Another option worth mentioning in this tab is Safe Placement – if checked true, the dialogue will try to find safe position if defined position is wrongly placed (underground, not on walkmesh, etc).
Dialogue timeline is the most important part of directors layout – on this timeline you add camera events, character lookats, animations, add pauses between dialogue lines and so on. Each character present in the dialogue (even those, who are not speaking) has its own row on the timeline. When you add an animation event on characters row, this certain character will play defined animation in defined moment. Also, there is a special row dedicated to the camera and you can add custom rows by clicking RMB on timeline.
By clicking LMB on an event you will notice, that properties of this event are shown on the right side of timeline. In these properties you can define for example what animation is meant to be played.
Dialogue preview plays dialogue with current cameras and animations, you can stop, skip, and change sections to next ones by using buttons below preview. Sections window shows you active dialogue line and dialogue section. You can also preview dialogue with loaded level, to do that load layers with dialogue setting and press green globe button in dialogue preview.
Table of contents
Scene script tab
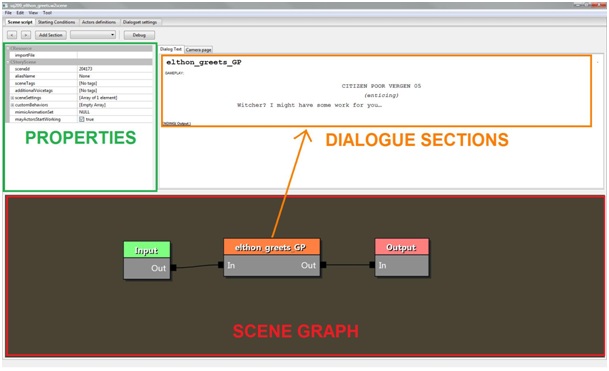
Scene script tab consists of three windows: dialogue sections (in here you write text), dialogue graph (here you define logical flow of dialogue), and properties.
Dialogue sections are parts of whole dialogue – each section is shown in scene graph part of editor as a single block.
NOTE: To add a new section click RMB in dialogue sections window or scene graph window, and choose right option from the list.
After adding a section you will notice, that a new block will be added in scene graph window. In this window you define logical construction of the dialogue. The signal (which means, what is currently played/processed in game) will flow from the Input block, to the Output block (where it exits from the scene). When signal goes through a connection into a dialogue section it means, that this section will be played.
Every section can consist of any number of dialogue lines, for each line you define Voicetag (id of actor, who is supposed to talk) and write text he is supposed to say.
You can also put one dialogue choice per every section, which will always be placed on the end of the section. The reason for that is, each choice adds new outputs to the dialogue section (as you will notice on the scene graph). When player chooses a choice, the signal in the graph exits through the chosen output.
Aside from dialogue sections, inputs and outputs, you can also add script blocks and conditions in scene graph window. A script block allows you to use any script written in Script Studio or C++ inside the dialogue (for example, a script adding a fact to the facts DB). A condition allows you to control flow of the signal in dialogue, for example: you can if player has a certain type of item.
Each block you add has its own properties, which can be edited in properties window. Most important properties for scenes will be listed below.
Global scene properties (edited when you have no blocks selected):
•additionalVoicetags – here you define voicetags of actors, who will take part in dialogue but have no spoken lines.
•mayActorsStartWorking – important flag for gameplay dialogues only. Defines if actors taking part in dialogue can work in their actionpoints while talking.
Dialogue section properties (edited when you select dialogue section):
•isGameplay – this flag defines if dialogue section is to be played as cinematic dialogue (with all characters in defines slots, without possibility of movement, with defined cameras) or as a gameplay dialogue (in form of oneliners / subtitles, without blocking player and NPCs)
•hasCinematicOneliners – option for gameplay dialogues only, it defines if text should be displayed above NPCs head, or as a subtitle on screen.
•pauseInCombat – if checked true, dialogue will pause if combat starts, and will be unpaused after combat ends.
NOTE: it is advised to use on gameplay dialogues only.
•canBeSkipped – cinematic dialogue flag only, if checked true dialogue lines will be skippable.
•numberOfInputPaths – by default this property has value of 1. If value is more than 1 you will notice, that dialogue section block will have new input and output (they will be numbered automatically). It is used for advanced control of signal flow in dialogue, if signal enters through input1 it will exit from output1, if it enters though input2 it will exit through output2, and so on.
NOTE: This won’t work if you have choice in dialogue section.
Last, but not least, there are cutscenes. Cutscenes can be played from the scene file, to add a cutscene you simply add cutscene block in scene graph window and link a proper cutscene from Asset Browser in cutscene block properties. Cutscene sections can be edited in Dialogue Sections window just as any other dialogue section.
Starting Conditions tab
This tab is mostly informative, most of its contents will be updated automatically as you work in other tabs. There are few options worth mentioning available in this tab:•Must Use Context Actor – this flag is important when making Voicesets, if scene is supposed to be a Voiceset it must have this option on true.
•Invulnerable – this flag defines if NPC is supposed to be immortal for the time of dialogue.
•Left item / Right item – in here you can add an item from droplist, which is supposed to be in NPCs hand during the dialogue.
Actor definitions tab
This tab is very important for most dialogues, in here you define what actors should be taking part in the scene and how the game is supposed to find them. You can add new entries by clicking RMB. Not all of the fields need to be used in each dialogue, there are several combinations as descripted below:•Voicetag – this field is obligatory, it defines a Voicetag (Voice id of an NPC) for the whole line.
•Actor Tags – this field is to be used only, if your NPC has an unique tag, and if you want game to find him by this tag. This flag is optional.
•Actor template – this field is used for two purposes: first, when the game will be searching for a fitting NPC to play a dialogue, it will check if potential NPCs are spawned from this template. Second, if game won’t find an NPC to play a dialogue, it will spawn a new one from this template, for the time being of dialogue only.
NOTE: This flag is optional, but it is advised to use it as failsafe.
•Appearance filter – this option allows you to define appearance name, which searched NPC will be required to have. This flag is optional.
•Dont Search By Voicetag – this option forces the game to search for NPC using filters other than Voicetags, such as Tags, entity template, and appearances.
Dialogset settings
In this tab you define the place, in which dialogue will be played (used for cinematic dialogues mostly). To do that, you have to put a Scene Waypoint object in the desired place on location, and give it an unique tag in properties. After doing that you put that same tag in Position Entity column.NOTE: If you leave this column empty, dialogue will either play in random position, or in the place of pivot (described later on).
You can also change type of setting for your dialogue (default is 4vs4), by linking from Asset Browser another type of setting into Dialogset column.
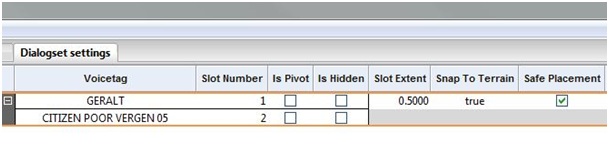
Second part of this tab consists of options, which allow you to put every NPC in desired positions. Each slot in a dialogset has its own id number, which can be seen when putting Scene Waypoint on level. In slot number column you define this very spot for each NPC (Voicetag column).
NOTE: Putting same slot number for two NPCs or leaving this column empty will generate bugs.
If Is Pivot flag is checked true, the dialogue will be played where the NPC that is pivot is standing.
NOTE: If you have defined both scene setting tag and Is Pivot, then Is Pivot flag will be ignored.
If Is Hidden flag is checked true, targeted character will be invisible in dialogue until he plays enter animation. Also, he won’t be visible anymore after playing exit animation.
Another option worth mentioning in this tab is Safe Placement – if checked true, the dialogue will try to find safe position if defined position is wrongly placed (underground, not on walkmesh, etc).
Directors layout
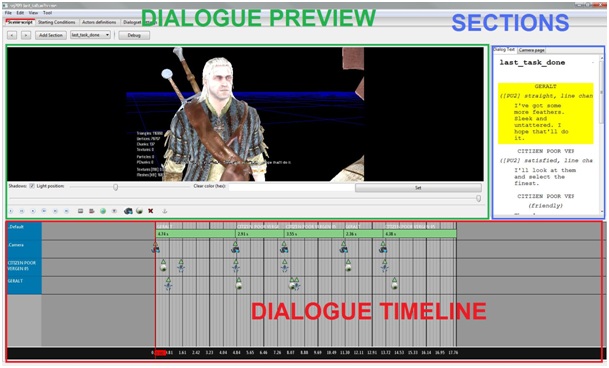
Directors layout is a set of tools used to implement gestures and cameras for each dialogue. To change layout, click view -> directors layout. You will notice, that whole layout in scene script tab has changed showing a preview of dialogue, dialogue timeline, and sections preview.
Dialogue timeline is the most important part of directors layout – on this timeline you add camera events, character lookats, animations, add pauses between dialogue lines and so on. Each character present in the dialogue (even those, who are not speaking) has its own row on the timeline. When you add an animation event on characters row, this certain character will play defined animation in defined moment. Also, there is a special row dedicated to the camera and you can add custom rows by clicking RMB on timeline.
By clicking LMB on an event you will notice, that properties of this event are shown on the right side of timeline. In these properties you can define for example what animation is meant to be played.
Dialogue preview plays dialogue with current cameras and animations, you can stop, skip, and change sections to next ones by using buttons below preview. Sections window shows you active dialogue line and dialogue section. You can also preview dialogue with loaded level, to do that load layers with dialogue setting and press green globe button in dialogue preview.